Advanced Touring Method Phase Two: High-performance Touring Utilizing Rear Panniers and a Unique Front Gear-Overflow System
A Unique Gear-Carrying System that Defines Phase Two
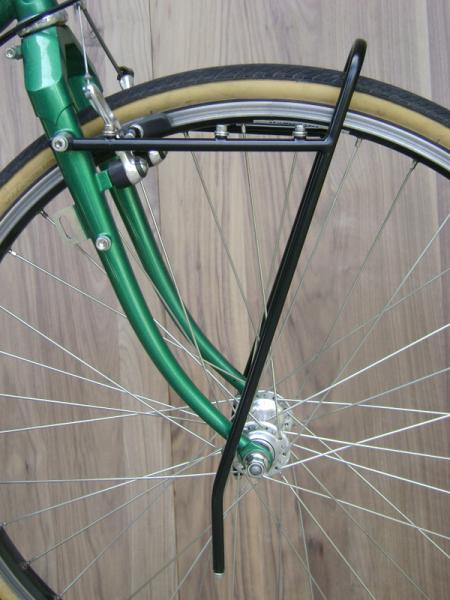
The foundation for a superbly lightweight and highly effective Phase Two gear-carrying system is a thoughtfully designed tubular chrome-moly steel rack that may weigh less than nine or ten ounces, like the one above.
The second phase of the Advanced Touring Method requires a very simple design to develop more gear-carrying potential on a touring bicycle, when it's required. It is defined by a unique, ultra-lightweight system that allows dramatically more gear to be carried without resorting to traditionally designed panniers. The system that I've used for decades is marked by a high degree of gear-carrying stability, but in its latest commercial permutation includes little more than a rack that weighs only 9 or 10 ounces and cleverly designed stuff-sack panniers that are nearly featherweight (about two ounces per pair).
In my experience, my usual assortment of touring gear doesn't stretch beyond the need for more than just a rear pair of panniers in many riding conditions, but it is where the pavement ends that the need to carry more gear, as well as Phase Two, often begins. Paved roads typically find their way to places in which food and water are easily obtainable on any given day, or many times each day on a tour. When I get off the beaten track a bit it may be a day or two or three between stops for food and sometimes there may be long spaces between places where water can easily be found. I know from far too many experiences that it doesn't have to be a particularly long stretch in an arid region before my three- or four-bottle capacity for carrying water on my bicycle frame reaches its limit. If I take a side trip, and a night or two or three into the boonies, the extra food and water that I need to carry often requires that I jettison some gear from rear panniers to my front rack in a Phase Two system I started developing many years ago. The system is used to balance weight out between the front and the rear of my bike.
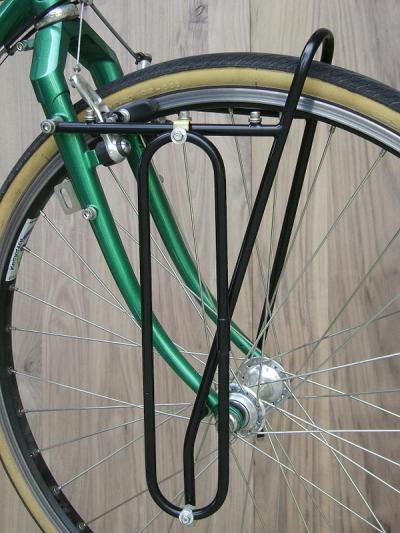
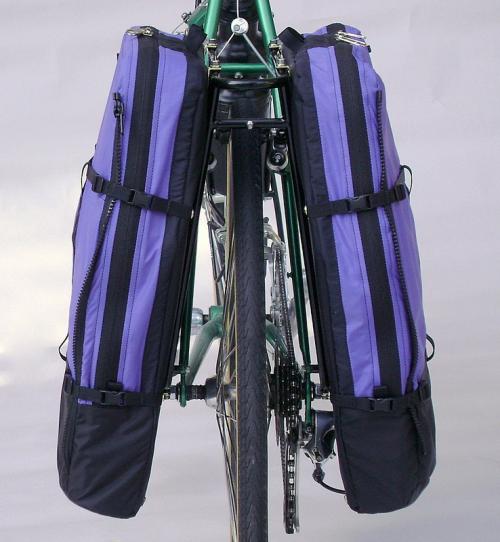
In Phase Two I don't carry front panniers as I know that most of the time I won't need them, and I don't want their resistance on my bike. I simply use a front rack, like the Three-Point Hummingbird rack in the photo to which two ATS Hummingbird Ultra Platforms are mounted. And, when food and water stretch the carrying capacity of my rear panniers beyond their limit, I mount one or two stuff-sack panniers to the platforms on the front rack. The rack itself weighs only 8.75 ounces and is extremely rigid, and the whole system including Hummingbire Ultra Platforms, straps and very lightweight stuff sacks has a combined weight of 14 ounces. It's an extremely stable system and works great for carrying extra gear. It's weight is so low that its impact is very small and it creates extremely limited resistance. As there are no panniers mounted to my bicycle (the stuff sacks are stored in my rear panniers) when the system is not being used, the remaining ultra-lightweight rack rides on the bike virtually unnoticed. The focus of Phase Two touring, and the systems that I have designed for it, is to develop a means to greatly increase the carrying potential of a touring bicycle for the occasional times in which extra gear, food and water must be carried, which weigh almost nothing and have an unnoticeable impact on the performance of a bicycle when they are not being used.
In my experience, my usual assortment of touring gear doesn't stretch beyond the need for more than just a rear pair of panniers in many riding conditions, but it is where the pavement ends that the need to carry more gear, as well as Phase Two, often begins. Paved roads typically find their way to places in which food and water are easily obtainable on any given day, or many times each day on a tour. When I get off the beaten track a bit it may be a day or two or three between stops for food and sometimes there may be long spaces between places where water can easily be found. I know from far too many experiences that it doesn't have to be a particularly long stretch in an arid region before my three- or four-bottle capacity for carrying water on my bicycle frame reaches its limit. If I take a side trip, and a night or two or three into the boonies, the extra food and water that I need to carry often requires that I jettison some gear from rear panniers to my front rack in a Phase Two system I started developing many years ago. The system is used to balance weight out between the front and the rear of my bike.
In Phase Two I don't carry front panniers as I know that most of the time I won't need them, and I don't want their resistance on my bike. I simply use a front rack, like the Three-Point Hummingbird rack in the photo to which two ATS Hummingbird Ultra Platforms are mounted. And, when food and water stretch the carrying capacity of my rear panniers beyond their limit, I mount one or two stuff-sack panniers to the platforms on the front rack. The rack itself weighs only 8.75 ounces and is extremely rigid, and the whole system including Hummingbire Ultra Platforms, straps and very lightweight stuff sacks has a combined weight of 14 ounces. It's an extremely stable system and works great for carrying extra gear. It's weight is so low that its impact is very small and it creates extremely limited resistance. As there are no panniers mounted to my bicycle (the stuff sacks are stored in my rear panniers) when the system is not being used, the remaining ultra-lightweight rack rides on the bike virtually unnoticed. The focus of Phase Two touring, and the systems that I have designed for it, is to develop a means to greatly increase the carrying potential of a touring bicycle for the occasional times in which extra gear, food and water must be carried, which weigh almost nothing and have an unnoticeable impact on the performance of a bicycle when they are not being used.
I've used many types of Phase Two platforms to which stuff-sack panniers are mounted. The ATS Hummingbird Ultra Platform is simply a formal, commercially made one, but very lightweight ones of wood, aluminum sheet and plastic can all be highly effective.
I've used similar systems for more than 30 years. It was in the early
1980s that I wanted to take a side trip from a little town in British
Columbia, which I was passing through on a tour, and knowing that the
capacity of my rear panniers would be exceeded by carrying extra food
and water, I had to improvise. It was there and then that necessity
became the mother of invention and I jury-rigged a system for carrying
additional gear on my front rack. I grabbed a piece of lath (yes, I
lifted it) from a local lumber yard and attached it to the side of my
the rack. The narrow piece of lath was used as a platform (like a
platform at the top of a rack) and a support, to which a stuff sack was
mounted and tightly compressed against it. This simple arrangement
allowed me to carry extra gear on the front of my bike. I had, in a
matter of minutes developed a simple system, albeit a bit crude, but
functionally it's much like the one I currently use.
Since then I've made many different types of platforms out of things as simple as a piece of an aluminum ruler or a piece of plastic, as well as very nice ones from laminated exotic woods. I've built systems for many types of racks; low- and high-mount racks and others in between. The current system is the result of years of experimentation that has led to a very good combination of durability, extremely low weight and high rigidity in the racks and platforms, and extraordinary stability in the stuff-sack panniers. This setup forms the foundation for my own Phase Two system. An alternative system, which is both extraordinarily lightweight and superbly functional is outlined in the "Budget Touring" section of this website.
Since then I've made many different types of platforms out of things as simple as a piece of an aluminum ruler or a piece of plastic, as well as very nice ones from laminated exotic woods. I've built systems for many types of racks; low- and high-mount racks and others in between. The current system is the result of years of experimentation that has led to a very good combination of durability, extremely low weight and high rigidity in the racks and platforms, and extraordinary stability in the stuff-sack panniers. This setup forms the foundation for my own Phase Two system. An alternative system, which is both extraordinarily lightweight and superbly functional is outlined in the "Budget Touring" section of this website.
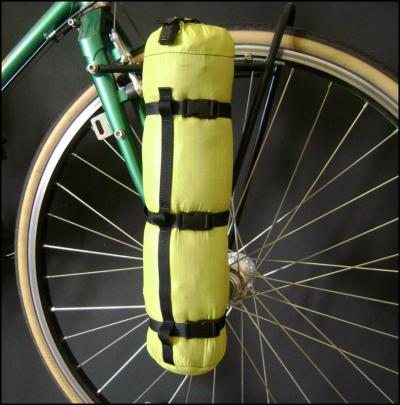
Stuff-sack panniers can be both extraordinarily lightweight and extremely stable. In Phase Two touring, when the panniers are not being used they may be stored away in rear panniers. At just a couple of ounces per pair, they are virtually unnoticed inside panniers
My current system acts as a very effective intermediate step in
high-performance touring between carrying gear in just rear panniers
(Phase One),
and in using both front and rear panniers (Phase Three), as in
expedition-oriented touring and tandem touring which often require the
use of two sets. The unique system by itself, although it represents a
critical step in design that defines Phase Two, stylistically, in terms
of an approach to carrying gear, it plays only a partial role in
establishing the highest levels of performance. The gear-carrying
system of Phase Two, combined with the thoughtful gear selection and
reduction in gear weight outlined in Phase One, develop the potential
for a very critical element of touring bicycle performance, and that is
in the use of high-performance wheels. Reducing the weight of rims,
tires, tubes and spokes on touring bicycles has a tremendous impact on
performance.
High-Performance Wheels as Part of an Advanced Touring Method
As I have mentioned previously there has been a common, knee-jerk tendency
among bicycle tourists to beef-up touring wheels to help offset the
impact of carrying an additional 30, 40 or 50 pounds of touring gear on a
bike, and sometimes even more. When carrying a significant amount of gear (like 40 or 50
pounds) that dramatically increases the weight bearing down on a
bicycle, compensation in wheel durability can be a very good idea, especially
if a fair amount of riding is on dirt. But high-performance
touring is a completely different ballgame. When touring is on paved roads, such compensation runs counter to
efficiency and is highly unnecessary when lightweight touring loads are
carried effectively.
The way I've always looked at the design of wheels for touring is that I want every available advantage in making riding as easy and exciting as possible during the weeks and months of tours. Therefore, wheels that are as lightweight as is practical are highly desirable. As a bicycle tourist I know all too well that I will always have the additional burden of carrying gear on my bike. That gear translates into a magnified riding effort because of the extra gear weight and through increased wind resistance, opposed to when I'm riding an unloaded bicycle. Consequently, I want to limit that burden, and the impact of carrying a full compliment of touring gear as much as possible, for very simple, practical reasons.
The way I've always looked at the design of wheels for touring is that I want every available advantage in making riding as easy and exciting as possible during the weeks and months of tours. Therefore, wheels that are as lightweight as is practical are highly desirable. As a bicycle tourist I know all too well that I will always have the additional burden of carrying gear on my bike. That gear translates into a magnified riding effort because of the extra gear weight and through increased wind resistance, opposed to when I'm riding an unloaded bicycle. Consequently, I want to limit that burden, and the impact of carrying a full compliment of touring gear as much as possible, for very simple, practical reasons.
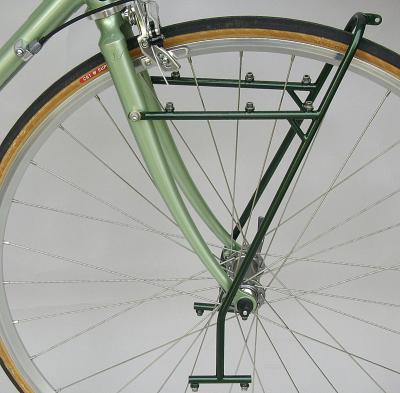
It only seems natural that a high-performance touring bicycle should include thoughtfully configured, lightweight wheels. The forward end of this Randonneur Lite 700 touring bicycle is set up with an exceptionally lightweight (9.75 oz.) Hummingbird Mid-Mount rack and with a very practical and lightweight touring wheels. The front wheel was built with a 28-hole, 405-gram rim that is 19mm wide. It is outfitted with a 215 gram tire that is 25mm in width. This combination of components is typical of a high-performance wheel that is used in Phase One and Phase Two touring by riders weighing under 150 pounds.
I have always regarded my time spent on bicycle tours as very precious time, therefore anything that I can do to make riding more pleasurable, I include in setting up a bicycle. I've simply found that less effort in riding encourages far more side trips, exploration and adventure, so it just seems that making riding much easier is a very natural and beneficial thing to pursue. I know from my own experiences and a lot of experimentation, that lighter wheels leave me less fatigued in each minute, hour and every day of touring. They have helped significantly, along with having no front panniers, to smooth out the rough days that are simply a part of bicycle travel, when I've sometimes wondered just when the headwinds would end. Efficient wheels are simply a component of bicycle touring that makes riding more enjoyable. Reducing the weight of rims, tires and tubes, as well as the number of spokes in wheels, to match my own body weight and the types of conditions in which I'll be riding, has become a very fundamental part of my own routine in setting up a touring bicycle.
Wheel design can be technical, and there is the nature of science and elements of physics that can play a part in their design, but I choose to look at design in a very simple way. It's not because I have a Paleolithic-level science IQ, but because in a practical sense wheel design can be looked upon in very simple light. As an example: on a touring bicycle that has no burden of extra weight over the front wheel, there is really no fundamental reason to add to the strength or weight of the wheel. If a very lightweight wheel holds up well on a high-performance road bike, it will indeed hold up for touring when the front end of a bike remains unloaded or is very lightly loaded at times. The same holds true for rear wheels. If a high-performance rear wheel holds up well for road riding, it will perform similarly for road touring as long as there is no more than a 20 or 25 lb. load added to a bike.
Wheel design can be technical, and there is the nature of science and elements of physics that can play a part in their design, but I choose to look at design in a very simple way. It's not because I have a Paleolithic-level science IQ, but because in a practical sense wheel design can be looked upon in very simple light. As an example: on a touring bicycle that has no burden of extra weight over the front wheel, there is really no fundamental reason to add to the strength or weight of the wheel. If a very lightweight wheel holds up well on a high-performance road bike, it will indeed hold up for touring when the front end of a bike remains unloaded or is very lightly loaded at times. The same holds true for rear wheels. If a high-performance rear wheel holds up well for road riding, it will perform similarly for road touring as long as there is no more than a 20 or 25 lb. load added to a bike.
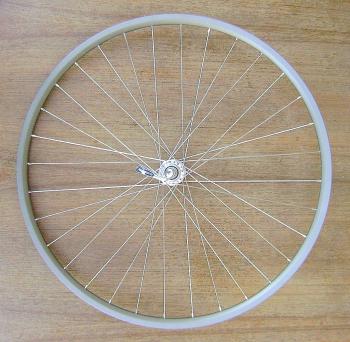
This 32-spoke, 26 in. (559mm BSD) front wheel with straight-gauge spokes is quite lightweight. Even though it has 385 gram rims that are 17mm wide, in the realm of high-performance road touring many cyclists can easily reduce spokes and use lighter, double-butted spokes in creating a wheel that is practical and very strong relative to their body weight. Especially in front wheels, in Phase One touring look to performance road bikes as a guide to wheel design.
As a bicycle tourist, I started out 40-plus years ago using, as many cyclists then did, racing bicycles as touring bicycles. My first touring wheels were very lightweight racing wheels, and my first touring tires were 20mm sew-ups that weighed 240 grams. At that time I usually carried between 12 and 15 pounds of gear, even in long-distance touring. I learned a lot from using such lightweight components. One thing that was very obvious is that when touring bikes are set up wisely, in terms of the amount of gear weight, racing wheels hold up exceptionally well. Another thing that I learned early-on was that fewer spokes could and should be used in front wheels. The common front wheels of that time, with 36-hole rims, were simply overkill. There was just no reason at all for front wheels to be built like rear wheels (only about 40% of a rider's weight is over the front wheel of a bike). So I moved forward from 36-hole / 36-hole wheels (front and rear) to 32 / 36 and on to 28 / 32 for touring on pavement. I just kept on experimenting, trying always to develop a clearer sense of what is a practical minimum in terms of rim strength and weight, number of spokes and wheel-lacing patterns, and of tire width and design.
I'm still learning, but my general focus and philosophy with regard to road-touring wheel design has remained relatively consistent for decades. I go as lightweight as I can. I keep tire pressure high whenever practical. My attention, in developing efficient, lightweight wheels for touring is placed upon reducing the weight of the components that make the greatest impact upon performance: rims, tires, tubes and spokes. It's through the reduction of weight in the rapidly moving outer-wheel components that higher levels of performance are easily developed. As the rotational speed and distance traveled in tires is so much greater than at the center of the wheel (a tire's road-contact surface in a 700c wheel travels about 75 times further than the outside of the wheel's hub axle per each revolution of the wheel) that's the part of the wheel in which weight needs to be trimmed.
One of the things that is on the horizon for me is a new set of 700c wheels for a Hummingbird XC touring bike that I'm currently building for myself. I know that rim availability is very limited, but what I will use are the strongest, best-designed clincher rims that I can find at 19mm or 20mm in width and that weigh-in around 440 grams. Starting in the early 1990s I've used 25mm tires almost exclusively for road touring, but for my new wheels I'm going to use 23mm tires that weigh 215 grams. I haven't looked into tubes lately, but I'll be looking for the best tubes that I can find at the lowest weight, somewhere in the 55 to 60 gram range. The front wheels will have 28 spokes and the rear 32. Because of the way that the bicycle, rack and panniers are designed, and because I'll carry around 15-16 pounds of gear and food, I'll be approaching the new touring bicycle, in terms of its wheels, just as I would develop the wheels for a high-performance road bike for everyday riding. A lot of travel has taught me that there is simply no functional reason to use heavier wheels.
Ultra-lightweight Racks and Panniers in Phase Two Touring
There is a lot more to designing racks and panniers for high-performance touring than in just making them lightweight. To create the highest levels of bicycle handling qualities, racks and panniers are designed to move touring gear as close to the bicycle's wheel as possible. These Hummingbird 18 IFT panniers have extremely stable four-point mounting systems, and even at 21 ounces per pair they have a very effective compression/stabilizing system, an advanced gear distribution design and extruded HDPE load supports.
In addition to conscientious gear selection, a gear-overflow system that eliminates the full-time use of front panniers and well-designed, (rider)
weight-appropriate wheels, what also plays a crucial functional role in developing the highest levels of efficiency in
Phase Two touring, is the design of racks and panniers. Racks and panniers that are designed well will be exceptionally
lightweight, extremely stable, quite narrow and will have a very precise gear-distribution design. On average, high-performance racks and panniers will help eliminate eight or nine pounds of totally unnecessary weight from a touring bike
that is set up using both front and rear racks and panniers of a traditional design.
My own bike for Phase Two touring has a tubular steel front rack that weighs 9.8 ounces, a rear rack that weighs 12.7 ounces and rear panniers that weigh 21 ounces per pair. That may seem very, very lightweight, but I know from experience that racks and panniers can be built much lighter than they have traditionally been built, as I've designed and made many that are considerably lower in weight yet are much more complex in their designs and are far more advanced, performance-wise. A couple of years ago I found myself being curious about the prospects of ultra-lightweight aluminum racks for high-performance touring, so I designed and built steel lugs and I used them in constructing (with epoxy) a very rigid front rack of aluminum tubing that weighs, at least to me, a remarkable 5.8 ounces. I've also built very effective panniers that weigh less than a pound per pair.
In my presentation of Phase Three design and performance, I'll get fairly deeply into the design of racks and panniers, but for Phase Two, suffice it to say that a very thoughtful, conscientious approach to touring requires racks and panniers that are thoughtfully and carefully designed to maximize performance.
One additional thought regarding Phase Two touring. A number of people have asked me about frame packs and how they may fit into high-performance touring. One thing to consider is that for them to be designed well for touring, they need to occupy the same space that is already reserved, low in the main triangle of a bike frame, for carrying water and fuel. Water and fuel are both dense and heavy and are carried in the most advantageous position on the bicycle frame. So, they need to stay there. That puts frame packs up high. Also, frame packs cannot counter-balance the weight of gear carried in rear panniers as can gear that is mounted low on a front rack. So I see frame packs as being small, complimentary or auxiliary packs that can sometimes be used to a small advantage on a touring bike. As they are mounted high on a frame, they should be loaded with lightweight gear. If you feel that they can be useful, go for it. Or another way to look at it more clearly may be expressed in Stengelese or as a Yogism: every advantage has its advantages!
Website created by Imagine Web Design. Design of this website ©2013–2026.