Advanced Touring Method Phase One: Ultralight Touring with a Single Pair of Specialized Rear Panniers
Thoughtful, Systematic Gear Selection
If I were to embark on a cross-country trip tomorrow I'd be in Phase One of my system of Advanced Touring Method. I would have everything that I would need for the trip, gear-wise, packed away in a very narrow (3.25"), extremely stable pair of Hummingbird 18 IFT rear panniers, all 13.45 pounds of it. That's it. Only 13.45 pounds of gear in my panniers plus a couple of pounds of food.
That amount of gear may seem small, but it affords some luxury and a high level of comfort. It includes a roomy two-person tent, an MSR multi-fuel stove and all of my normal cooking and coffee-brewing paraphernalia. It includes a full compliment of essential gear including a rain parka and pants, shoe covers, down vest and a down sleeping bag rated to 20 degrees. Also among the gear is spare clothing, mittens and mitten shells, stocking cap, all essential tools, camera and my I-phone. Rounding out the pile of equipment are my bathing items and an assortment of medical supplies. On a cross-country trip I would plan to camp out every night and I would be well prepared for cold weather and snow if I were caught off-guard.
That amount of gear may seem small, but it affords some luxury and a high level of comfort. It includes a roomy two-person tent, an MSR multi-fuel stove and all of my normal cooking and coffee-brewing paraphernalia. It includes a full compliment of essential gear including a rain parka and pants, shoe covers, down vest and a down sleeping bag rated to 20 degrees. Also among the gear is spare clothing, mittens and mitten shells, stocking cap, all essential tools, camera and my I-phone. Rounding out the pile of equipment are my bathing items and an assortment of medical supplies. On a cross-country trip I would plan to camp out every night and I would be well prepared for cold weather and snow if I were caught off-guard.

Ultra-lightweight panniers are a fundamental part of high-performance touring. These Hummingbird 18 IFT panniers, with their unique, rigid tubular- aluminum internal frames weigh only 21 ounces per pair.
Phase One of an Advanced Touring Method is about carefully selecting
gear so that a full range of touring gear can be carried in a single
pair of rear panniers. My rule of thumb for Phase One is that I try to
keep the combined weight of gear, food, rack and panniers under 20
pounds, and I never go over 25 before moving into Phase Two in which I
start balancing out some of my gear on a front rack. The Hummingbird
rack/pannier system that I currently use weighs a total of 34 ounces, so
that, combined with the 15.45 pounds of gear and food, adds up to just
shy of 18 pounds, which places me below the limits which I have set for
myself in Phase One.
In terms of performance, a bicycle with less than 16 pounds of gear and food, packed into extremely stable rear panniers, is in a completely different dimension than one with front and rear panniers burdened with 30 or 40 or 50 pounds of gear. It's an absolutely black and white contrast. Riding a bicycle with no front panniers and a reasonably small amount of gear in well-designed rear panniers is not that far from riding an unloaded bike. And that's what I was trying to create when I first started getting serious about developing a means to travel well on a bicycle decades ago. I have always worked toward creating touring bicycles that remain a pleasure to ride when they are fully loaded. The means of creating a fast and fun bicycle is not difficult to accomplish.
The system that I use to select gear so that when it is all added up, totals 12 or 15 or 18 pounds, relies upon finding the optimum choice in any particular type of gear, large or small. I find the best choice among every piece of gear. First, gear has to be fully functional, and from there I chip away at reducing its weight through selection or modification. If that gear is a nail clipper, I'll find a half dozen around the house and I weigh them all on a scale that measures weight in grams (a gram scale used to weigh gear is an important component in setting up a touring bike). If the lightest works just fine, then for bicycle touring that's the obvious, best choice. There are well over 100 pieces of gear on my bicycle touring gear list. Through the years I've gone through that list, item by item, finding better and better options for each piece of gear. I haven't gone through my list once or twice. I revise what I carry from trip to trip to trip. Its an on-going process.
Gear selection and modification doesn't take a whole lot of effort, but the results can be absolutely amazing. I consider the great potential for reducing the weight of a touring bicycle through gear selection to be the single-most important factor in its efficiency and performance. It's huge. So it's not something that I take lightly. Many years ago I purchased an inexpensive scale that measures in grams. Being able to measure many small, lightweight types of gear in grams (there are 28.4 grams per ounce), which is a relatively small unit of measurement, is very effective in making comparisons. It often reveals some unique differences, in comparing the individual weights in particular types of lightweight gear, that might be completely overlooked if ounces were used as a unit of measurement.
If you have the ambition of traveling on your bicycle much more easily, you will be able to reduce the weight of many types of gear very significantly. You'll be shocked. Cutting the weight of many pieces of gear in half is actually a small reduction. I'll provide some examples, just to get you started. And I'll discuss gear modification a bit as well. I should probably also note that when I'm selecting gear, I'm not only searching for an optimum, weight-wise, I'm also looking for the very best choice, performance-wise.
Bicycle touring is a highly specialized activity, so I search for highly specialized gear, and that isn't very easy to find at times. Gear that is serviceable in some way is easy to find, but specialized gear that is highly appropriate to a unique task of bicycle touring is not always obvious. It isn't always right out in the open. Sometimes it simply doesn't exist, and then gear modification or invention is in order.
Large, Heavy Items
Tents
A tent is a very important piece of equipment for bicycle touring. I've chosen it as an example of one type of gear that really needs to be bicycle-touring specific or touring-appropriate. Also, it is an example of one of many types of equipment that I've easily modified to reduce its weight by 13 ounces, which is a reduction of nearly a third its original weight. In high-performance bicycle touring a tent should be as lightweight as possible, yet it must provide full protection in a broad range of climatic conditions, including high winds, wind-driven rain and from insect pests and critters. So it's important to select not just any reasonably well-designed tent, but one that is fundamentally sound in its protection, and that is very lightweight and that has a great performance-to-weight ratio.
Among quality tents, weight and performance can be highly variable and contradictory. I've photographed three tents that I have in my collection of many. Unfortunately, I no longer have any tents that fall, weight-wise, between the green Stephenson tent that I have used for four decades on bicycle-touring trips, and the two mountaineering tents that I have pictured. I've chosen the tents to use in a comparison for a few important reasons that revolve around their contrasts in weight and in the amount of protection from the elements that they afford. I originally purchased the Stephenson tent, on the left, very specifically for bicycle touring in the mid-1970s. It originally weighed 2lbs. 13 oz and has always provided, once it was very carefully seam-sealed, good weather protection at a very low weight as long as it is well maintained.
Among quality tents, weight and performance can be highly variable and contradictory. I've photographed three tents that I have in my collection of many. Unfortunately, I no longer have any tents that fall, weight-wise, between the green Stephenson tent that I have used for four decades on bicycle-touring trips, and the two mountaineering tents that I have pictured. I've chosen the tents to use in a comparison for a few important reasons that revolve around their contrasts in weight and in the amount of protection from the elements that they afford. I originally purchased the Stephenson tent, on the left, very specifically for bicycle touring in the mid-1970s. It originally weighed 2lbs. 13 oz and has always provided, once it was very carefully seam-sealed, good weather protection at a very low weight as long as it is well maintained.
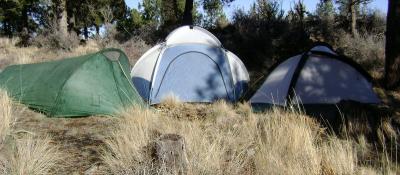
I've been using the large, very lightweight Stephenson tent on the left for nearly forty years. I've modified it several times and it now tips the scales at 2 pounds, Its fabric has died from long-term exposure to sunlight and one of these days I need to re-make the tent and improve upon its original design.
Both the North Face four-pole dome, and the Noall three-pole self-standing tent at the right in the photo weigh over seven pounds. The North Face tent is not designed well relative to weather protection (no zipper flaps and the rain fly is inadequate), has a very inefficient footprint and it has both excessive pole and fabric weight. The Noall tent is made very well, is detailed quite nicely and provides great weather protection, but it's really excessive in every way for bicycle touring. Both tents have low performance-to-weight ratios. Even though I never use either as a solo tent, they're way too heavy for long backpacking trips or bicycle touring. A four- or five- or six-pound version of either tent would still be too heavy for high-performance bicycle touring.
The Stephenson tent in its current, altered form weighs two pounds. At that weight, and given the shape of its footprint, it's both lightweight and quite roomy for two people and gear. As a solo tent it is still light enough that it's a very good alternative to a bivouac sack. Its design is unconventional in that it is a single-wall tent, opposed to a double-wall tent that has a separate rain fly, and has to be used accordingly (all seams must be effectively sealed).
I bought the Stephenson almost 40 years ago, when most backpacking tents weighed nearly six pounds or more, specifically for a bicycling trip in which I started in southern Wisconsin and took a very long, serpentine route through Canada to St. Johns, Newfoundland, where I turned around and headed west to Stanley, Idaho before traveling east once again. During the first month of the trip in late April and May there were 24 days of rain. In Newfoundland rains were delivered by 60 mph winds. Had I not very thoughtfully sealed all of the seams in the tent before leaving, it would have leaked like a sieve. It didn't, and I have stayed dry in the tent on many, many trips over the past four decades.
When I bought the tent it weighed 13 ounces more than it does now. Reducing its weight was important to me for bicycle touring. But I knew that reducing its weight would also reduce its bulk in an almost directly proportionate way. In high-performance touring, reducing gear weight is crucial, but reducing the amount of space gear takes up on a bicycle also has a very critical impact in eliminating the need for front panniers in many conditions, and ultimately in having an impact on riding quality and the handling characteristics of a touring bicycle. Forty years ago the Stephenson tent was a very, very lightweight tent, but I knew that it could be easily improved, weight-wise, without much effort on my part.
To reduce its weight I replaced the shock cord in the tent poles with cord that is half the weight of the original. The tent has 7 aluminum tent stakes. Only three need to be of full length, so I cut four of them nearly in half. When I purchased the tent it had a second layer of reflective material between the tent poles to reflect body heat in winter use. I certainly didn't need it for cycling so I cut it out reducing the weight of the tent significantly. Not only is the tent much lighter with modification, it now also packs, minus its poles and stakes, into a much smaller stuff sack (5 x 6.5). When I cut the reflective fabric out of the tent I also re-made the original stuff sacks for the tent using a lighter material (1.2 oz. Ripstop nylon). In addition, I replaced the braided nylon cord used to close the sacks with a cord that is a third the weight of the original 1/8th in. nylon parachute cord. All of the alterations were simple and they greatly improved the performance-to-weight ratio of the tent. Modifying the tent made it much more of a bicycle touring-specific tent.
The purchase of an effective, lightweight, touring-specific tent is an easy way to shave a pound, or even up to three or four pounds from a bicycle touring gear list. Given its importance in comfort and protection from the elements in long-distance touring, and in conjunction with its potential weight savings, it's a critical acquisition and one that should given serious thought and research.
Rain Gear

As a bicycle tourist creating your own high-performance touring bicycle you are not just attempting to eliminate extraneous gear weight, you are also working to greatly reduce the amount of space that gear takes up in your panniers. You can see in the progression of types of rain jackets that with the loss of weight there is also an extreme reduction in gear bulk.
Can your rain parka fit inside a coffee cup? Does it weigh as little as a candy bar? These are two things that I was looking for in rain gear as I searched in recent years to replace my aging cycling rain jacket and pants. I've tried a lot of different kinds of rain wear: ponchos, cagoules, anoraks, Gore-Tex parkas and pants, as well as parkas and pants made from coated nylons. Most of the rain gear that I've tried out was ridiculously heavy and bulky.
Pictured at the top, rolled up, is my four-pocket, full-zip Gore-Tex parka that was given to me in the 1970s (I only had to beg a little). It's great for romping around town but it has no place in bicycle touring. It takes up an absurd amount of space in any pannier and weighs 21.4 ounces. Next to it is an old red Patagonia rain jacket that too is over-designed for cycling. It's a two-pocket design that isn't quite the boat anchor that the Gore-Tex jacket is, but it is still way too heavy for bicycle touring. It hits the scale at a pound and is too bloated to put in any pannier. Next is my Dri Ducks jacket. No pockets, one front zip; a huge step in the right direction. It's a no-frills choice and is just enough to keep the weather out. It weighs six ounces and is relatively compact. And last in line is a jacket of the same design but of lightweight materials, and it fits in a coffee cup! After looking high and low for really good, and very lightweight rain gear, I finally had a friend custom-make me a simple jacket with nothing more than a hood and front-zippered opening, and matching pants that are very simple. They are constructed of 1.2 oz. silicone-impregnated Ripstop nylon. The two together weigh about seven ounces.
To me, a rain jacket for bicycle touring should have no pockets. Keep it simple. Keep it very lightweight, and then it will be small when packed. Whether its material breathes a little is of personal preference.
Large or Heavy Items Made Smaller and Lighter
Camera Cases

We are most likely moving into an era in which devices, like my I-Phone, simplify carrying separate cameras, phones, computers and telephones. Still, for anyone using older-style devices, how they are protected can have a very significant impact on both their weight and the amount of space that they ultimately take up.
Many cyclists carry a camera for shooting photos, or even a video camera, a cell phone or another type of electronic device to take videos or photographs of their cycling journey. They all need to have some type of case or protection from damage.
I've seen cases like the one at the top of the photo being used by cyclists carrying a video camera, and the one directly below it on the left, to carry cameras. They weigh 15 and 3.2 ounces, respectively. Both are nice, protective cases that function well, but they are not a wise choice for bicycle touring. I'd suggest something a bit different if you are using a video camera or lightweight camera to take photos. The foam and plastic hand-made items in the photo are what I have used for many years. Their total weight is less than half an ounce. I've made many cases like the tan-colored one that I cut out and glued in a few minutes with 1/4 foam, a utility knife and a hot glue gun. They work very well and are extremely protective.
An even easier-to-make alternative is the one next to it that I've made with a little bubble wrap and 2 clear packaging tape in a couple of minutes. It functions well, but I don't use it on its own. I use it in conjunction with a lightweight Ziploc plastic bag. My camera first goes into the plastic bag, which protects it from dirt, salt (salt once toasted an expansive camera of mine on a bicycle trip) and moisture. The camera next goes inside the simple bubble-wrap case, which goes inside a spare sock, which goes inside one of my panniers. In the end my homemade system, that took less than a couple of minutes to make, is as protective as a commercially built case. It weighs 4 grams or about 1/7th of an ounce. A little inventiveness goes a long way in playing an important part in your own role in designing and developing a high-performance touring bicycle.
Towels
Every item on a touring gear list is a component of a touring bicycle, no matter how small or seemingly insignificant it may appear at first glance. It has a purpose and it has a weight. Each item, from rubber bands to stuff sacks, is really no different than a rack, or a derailleur, or a tent or a cooking pot in the overall equation of performance that relates to efficiency.
There are probably few touring cyclists that think of a towel in such a light, but I think that its crucial when gearing up for touring that cyclists be aware of the possibilities in increasing the performance of their bicycle by looking at gear in such a way. Every individual component part, even those that may seem too small or lightweight to matter, are part of an ensemble that, when added up, represents a functional part in the overall weight of a touring bike. Each component plays a role in determining whether a touring bicycle will be exciting and a joy to ride, or that may ultimately grow, bit by bit, and piece by piece, to become a beast of burden. Each component has the potential to be reduced in weight and in the amount of space it takes up in panniers.
There are probably few touring cyclists that think of a towel in such a light, but I think that its crucial when gearing up for touring that cyclists be aware of the possibilities in increasing the performance of their bicycle by looking at gear in such a way. Every individual component part, even those that may seem too small or lightweight to matter, are part of an ensemble that, when added up, represents a functional part in the overall weight of a touring bike. Each component plays a role in determining whether a touring bicycle will be exciting and a joy to ride, or that may ultimately grow, bit by bit, and piece by piece, to become a beast of burden. Each component has the potential to be reduced in weight and in the amount of space it takes up in panniers.

You most definitely can get away with not bringing a towel on a tour. A T-shirt like the one on the right (I'm doing a little advertising for the Meadowmount School of Music) will work just fine. Many travelers would never dream of carrying a towel.
The towels that I have pictured weigh, respectively from the left, 26
oz., 14 oz., 6.5 oz. and nothing. On my gear list I have a towel listed
at zero grams. For a long time I used the thinnest, most beaten-up
hand towel that I could find around the house before I saw it as an
unwise choice for bicycle touring. I then switched to the universal
first option, a T-shirt or my polo shirt, which is my spare dress shirt
on the road. When I bath I dry off with a shirt and hang it to dry in
camp or I dry it on my bike, attached to and spread over, my panniers
while I'm riding. If you use a towel I'd suggest a hand towel such as
the one in the photo. Perhaps out of a sense of the need for comfort on
the road I have noticed a number of cyclists carrying a full bath
towel. It may work great at home, but it's not a touring-specific
choice and is best avoided.
If you add a towel to your gear list you might consider what its weight means in terms of efficiency. All weight adds up. If a towel weighs 7 ounces or 14 or 26, it is no different than a derailleur that weighs 7, 14 or 26 ounces more than others. I doubt if anyone would purchase a derailleur if it weighed 3 ounces more than other choices, and certainly not 7, 14, or 26. Or turn the role of weight around and think of it like this: how much money would it cost for you to purchase a touring frame from a custom builder that is 14 or 26 ounces lighter than other frames? 26 ounces is nearly two pounds. A two-pound reduction in frame weight can be very seductive, and it may cost thousands of dollars because many cyclists see value in reducing the weight of a bicycle frame. Considering that a towel is packed at one of the ends of a bicycle frame, it's weight is more critical than frame weight in its impact upon bicycle handling quality. All weight, large or small, when added up, has meaning in performance.
If you add a towel to your gear list you might consider what its weight means in terms of efficiency. All weight adds up. If a towel weighs 7 ounces or 14 or 26, it is no different than a derailleur that weighs 7, 14 or 26 ounces more than others. I doubt if anyone would purchase a derailleur if it weighed 3 ounces more than other choices, and certainly not 7, 14, or 26. Or turn the role of weight around and think of it like this: how much money would it cost for you to purchase a touring frame from a custom builder that is 14 or 26 ounces lighter than other frames? 26 ounces is nearly two pounds. A two-pound reduction in frame weight can be very seductive, and it may cost thousands of dollars because many cyclists see value in reducing the weight of a bicycle frame. Considering that a towel is packed at one of the ends of a bicycle frame, it's weight is more critical than frame weight in its impact upon bicycle handling quality. All weight, large or small, when added up, has meaning in performance.
Locks and Cables, Straps and Bungee Cords

Many types of wise gear choices, including those among different types of locks and cables and gear mounting straps, can provide weight reductions that are truly extraordinary. A ten-fold reduction in gear weight is a very significant improvement.
I have often felt a need to carry a lock and cable on tours when I've traveled alone. But when I began touring the decision to carry a lock and cable was an excruciating one as they weigh so much and take up a great deal of space. In my early years of touring I used a combination like that on the left in the photo. It weighs in at 13.3 painful ounces.
As better equipment became available through the years, many cyclists started carrying a combination lock/cable like the one pictured in the middle. It's a great improvement at a shade over four ounces. To me, such a weight is still absurd and about 16 or 18 years ago I realized that there was a much better solution. It was then that I began to use the lock/cable combination on the right. It weighs exactly an ounce, has a much longer cable than the other two combinations, is more versatile in terms of locking my bike and it provides equal protection against casual theft (anyone that can cut its cable can just as easily cut the other two types of cables). I'm getting there, but I'm convinced that there is a much lighter-weight solution.
For decades I've tried to convince bicycle tourists to never use bungee cords to attach sleeping gear, and other items, to the top of their racks (I've also encouraged members of the same group to never mount gear across their racks, but instead in a lengthwise orientation). Bungee cords are very, very heavy and are not nearly as effective, or as easy to use, as straps made of nylon webbing combined with side-release buckles as closures. The bungee cords on the left weigh 87 and 79 grams, respectively.
For a long, long time I used 5/8" or 3/4" nylon webbing straps because that is what I could find. The 3/4" strap in the photo weighs 11 grams and is a tremendous improvement over bungee cords in that it weighs dramatically less and in that it can cinch gear in place much more tightly and firmly than bungee cords can. But still, such straps are quite heavy. In the late 1990s I ran across some lightweight 7/16" webbing and eventually some really great side-release buckles. I use the same straps and buckles in the compression/stabilizing systems in my panniers. The strap at the right weighs only four grams. Four grams is not a lot. It's only 1/7th of an ounce, but I know from experience that it is still serious overkill. Nonetheless, it provides a substantial improvement over other combinations of webbing and fasteners, and is in a completely different dimension of functionality than the dreaded bungee cords are in.
Little Stuff That Adds Up
Braided Nylon Cord

It is so easy to overlook seemingly insignificant gear, and the amount of space that it takes up, as well as the impact of its weight as it is combined with the weight of many other small items. All types of gear really need to be scrutinized relative to their potential to add totally unnecessary weight.
It's easy to overlook the small stuff. But a lack of attention to the details of selecting and modifying what may seem to be quite insignificant items of gear, can add up to an amazing amount of unnecessary weight.
When I hang my food up to keep it away from bears and other smaller camp robbers, I use a length of nylon cord. I also use the same cord for hanging one end of my bike to true wheels while I'm on the road. For years I always put about 30 feet of 1/8" braided parachute cord in my panniers for any trip, long or short. It seemed to work fine. It didn't take up much space, and it hit the scales at 51 grams, or a bit less than 2 ounces.
A couple of ounces isn't much, but one day it started pulling on my sense of efficiency and it began to seem like a bit of an overkill. I eventually found smaller, 1/16" braided-nylon cord. Did I really need 30 ft. of cord? I cut back to 20 ft. of cord and I reduced down to 18 grams. One day I noticed that the window blinds in our house have a still smaller-diameter cord and I started looking for a source of it, but before I found a source I found something even better. I noticed that my kids were making some beaded necklaces and were stringing their beads on to a braided cord that was very small, but still quite strong. Their cord totally changed my approach. Today, my standard cord for hanging food is 20 feet of braided cord that weighs 3 grams. My original 1/8" cord took up a space in my panniers about the size of a small orange. What I'm using now rolls up to about the size of a large grape, and at 3 grams it essentially weighs nothing compared to the original cord at 51 grams.
I learned a lot from my search to find a more appropriate form of cord. It, along with other similar searches, taught me that it is an accumulation of small details that often make extraordinary differences in performance.
Flashlights

Like so many types of equipment that we use in bicycle touring, flashlights are available in a multitude of forms. Among the many types there will be one the provides a good combination of essential light, durability and low weight. It is important to think of all the gear that we carrying in bicycle touring as components of a touring bike, just as we think of derailleurs or chains or handlebar stems. The careful selection of each component has a significant influence, as part of a composite of components, on the riding quality and performance of your touring bicycle.
I didn't have much trouble finding flashlights around the house - more than two dozen in a quick search - ranging in weight from 44 oz. to less than 1/5th of an ounce (the very small red light at the bottom in the photo). What is interesting about the lights that I gathered is that few of them work, which is why I started to use scuba-diving lights for cycle touring in the 1970s. The first diving light that I used is the Tekna Lite. It's the black light in the photo and it proved to be stout, but not durable enough. So I started using the yellow Q 40. It is quite durable, but relatively heavy at 5.3 oz., and large. It puts out a lot of light and is extremely well sealed. The small, red Q 40 light that is one up from the bottom, is my choice for bicycle touring. It's a small, well-sealed, two-cell diving light that works great for me. It weighs in at 36 grams. At not much more than an ounce it often puts out more light than I actually need for scrounging around camp.
Allen Keys and Coffee Cone

A lot of gear that we use in, or purchase for, bicycle touring serves a purpose in some place quite well but isn't particularly well-suited to touring. And to make such items work better a little modification or innovation is in order.
The two sets of allen wrenches are a good example. I've seen such sets carried by many bicycle tourists. They are fine for around the house or shop, but not a good choice on the road. Most of the wrenches in a set will never be used on a bike tour. The case in which the wrenches are held is just dead weight. Instead of carrying a case of wrenches I take a modified approach and bring on tour only the three that I commonly use. Two are for rack and pannier screws mainly, and the heavy, short one in the photo is used for many bicycle components. It's short because it can be. It's full leverage wasn't necessary so I lopped it off and now its a touring-specific tool.
The three wrenches weigh a total of 25 grams, or slightly less than an ounce. The two encased sets weigh 149 and 125 grams respectively. Not using a set quickly gets rid of nearly 4 to 5 oz. of totally unnecessary baggage. I know from experience that I might need other wrenches, like one that tightens my handlebar stem, for instance. I've never had to use such a wrench on a tour, but if I did, I'd borrow it, unless I were riding across Africa, and then I'd carry it. But who knows, I just might role the dice in such a situation.
It was on a bicycle tour of Iceland and Europe that I started drinking coffee and got addicted. The addiction seems to be a good fit as I've happily maintained it. With it comes the need to carry all of the drug paraphernalia used to cook up its lively taste. Part of the bean junkie's tool kit is a large one-cup coffee cone used in brewing coffee. I've pictured one that is like the three or four that are used daily in our kitchen. They're just fine at home, but they are massive, awkward hunks of plastic inside a pannier. For touring, surgery seemed like a reasonable solution to reducing mass. Aircraft shears and bench-mounted belt sanders were applied to the task and 40% of the original 52 grams of one of the cones found a new life in a landfill. It was a good start, but after the surgery and a few trips I simply found the cone to still be too heavy and awkward. A little brain-storming, along with about nine minutes, a pair of scissors, compass and a Japanese Dozuki saw, I crafted the alternative that I've pictured. It's made in two parts, hits the scales at seven grams, takes up less than half the space inside panniers than a commercially made cone, and does the trick. Triumph. The vice continues. I'm searching for others.
Summary of Gear Selection and of Phase One
In bicycle touring there are many types of gear that we use. What they all share in common is that there are many potential options to choose from in every type of gear. Each item plays a critical part in the process that revolves around the selection of the one that ultimately works really well. If the best option just doesn't seem good enough, I try to creatively modify it to make it a better fit for touring. None of the modifications that I make to gear are difficult. From my very first tours I've cut the pockets out of, and off of, shorts and pants. I've never slept on a full-size foam sleeping pad, I've always chopped them down (currently down to 4.4 oz.). I don't need a whole tooth brush or hair brush, when half of small ones do quite well. And I modify containers. Food is never stored in boxes or jars, but plastic bags and plastic tubes (peanut butter). I pare down shampoo and toothpaste tubes to the tiniest sizes. I simply try to find or create the most advantageous version of any type of gear no matter how small. I select and modify gear to develop a touring-specific version of almost all types of the gear that I carry.
I think to myself that pounds are pain, so I've shopped and I've chopped. I've tried to find the best performance-to-weight ratio in every piece of gear that I use, especially amongst the gear that weighs the most: tent, sleeping bag, rain gear, clothing. My 850-fill goose down bag is rated to 20 degrees and weighs 1 lb. 12 oz.. I absolutely would not use a synthetic-fill bag, perhaps with the exception of world-rounder. I hand wash regularly on the road, I take little spare clothing. It would be impossible for me to overstate just how important gear selection and modification is. As I've said, more than anything else (with the exception, possibly, of the reduction in weight of outer-wheel components) it defines the performance of a touring bicycle.
Once you've gathered all of your gear together, you've got to find out how much space it takes up. You'll want it to take up as little space as possible. If gear can be compressed, compress it. For instance, if you roll your down jacket up tightly it will still take up a lot more space than it will if you stuff it in the smallest stuff sack (and lightest) possible. You'll want to make sure your other gear is packed as efficiently as it can be. Your cooking pot will serve you best if it is filled with gear before it goes into your panniers. A spare shirt and rain gear can be rolled up very, very tightly and then secured with a couple of rubber bands, or even better, a tiny bungee band that you've made yourself, so that they'll stay tight and won't unroll inside your panniers. A drinking cup can be filled with a spare pair of socks (generally, clean ones are the first choice). Work at paring down what you've got.
When you've got your gear mashed and stuffed and rolled and trimmed down as far as it will go, put it in a box and measure the amount of space that it takes up (length x width x height). Weigh it all. What you come up with will determine whether you can use a single pair of rear panniers, and that's the goal in Phase One: to carefully select gear so that you can take a cross-country trip with a single pair of rear panniers and avoid all of the wind resistance, and the resistance of the weight of gear, that is carried on a front rack and panniers. And when I say rack and panniers I don't mean just any rear rack and pair of panniers, either. There are vast differences in the design of racks and panniers that have a great impact upon performance, which I'll discuss in Phase Three.
As I've mentioned, I try to stay below 20 pounds in the combined weight of rack, panniers, gear and food, and I never go over 25 before I balance some gear on the front end of my bike. The total weight of gear is critical, but loading and stabilizing gear is also very important. Rack stability, pannier stability, pannier shape (especially depth), pannier compression and the lateral, vertical and fore/aft loading of gear all play an important role in Phase One. Within Phase Three, which is coming up shortly (Phase Two is very brief) I'll present a very in-depth discussion of gear loading, along with pannier and rack design, that plays a very important role in performance.
Website created by Imagine Web Design. Design of this website ©2013–2026.