My Custom Bicycle Frames and Racks: the Difference is in the Details
An Introduction to the Details of Design and Execution
To me, the essence of any exceptional product lies in exceptional details of refinement: details that relate to design, performance, craftsmanship, creativity and innovation. Much of my focus as a custom bicycle builder revolves around a multitude of details that I am constantly re-shaping, refining and expanding upon in the bicycle frames, racks and panniers that I build, which comprise my part of the execution in building a custom bicycle.
When you begin the process of purchasing a bicycle from me, it's the intricate details that define both the performance and creative elements that make up a truly one-of-a-kind bicycle, which we will be discussing. For each of the nine models of bicycles that I offer I provide a general description of its design. From that basic outline we will fill in all of the details, taken from numerous possibilities in each area of an array of frame designs, including the design of the fork crown and tips, seat cluster type and its execution, and seat stay top-end and tip types. We will also look into possible lug designs from my more simple standard designs to the exotic, as well as bottom bracket shell execution, the style of cable routing, whether the bike will be of a Standard, Ultra or Signature version of each model and other design elements. If it is a touring bicycle, rack and pannier designs with be determined from a wide range of possibilities, not just in terms of individual models, but through a breakdown of the components of their design (mounting system, compression system, zipper design etc.) which will be chosen to, in the end, develop the best performance-to-weight ratio and to best meet individual needs relative to use.
When most cyclists approach me about having a custom bicycle built they usually have had little, if any, exposure to true custom bicycles or to a high level of craftsmanship. At a time when most bicycle frames, including a great percentage of custom frames built from steel, aluminum or titanium tubing, are assembled using welding as the process of adjoining tubes, always displaying the simplest, crudest and cheapest of industrial-production methods, it's no small wonder that cyclists haven't had the opportunity to see bicycle frames that are executed to a high standard.
It's kind of amazing to me, but as production methods in the building of bicycle frames have been marginalized and streamlined during the past few decades, custom bicycles are now often built using absolutely no custom parts and that display absolutely no level of custom quality that set them apart from production bikes. It is common that custom frames display the narrowest range of craftsmanship, from the poorest-possible level upward to those that are still woefully unexceptional, and that are devoid of all or most details that once marked the finest of custom bicycles. And, especially among "custom" touring bicycles, the narrowest range of designs that may be used to elevate performance is also commonly displayed. So I guess that I shouldn't be surprised that to many cyclists a custom bicycle is little more than the sum of its components (brakes, derailleurs, rims etc.) and the type of tubing from which its frame is fabricated, with a curved tube or two thrown into the mix to give it some measure of distinction. And that's about it. It is hard for me to conceive of a less imaginative, dispassionate approach, with duller, more visually inert results, than in using welding as a construction method in building bicycles. But that is what most people see. Luckily there are alternative methods that provide many different dimensions to bicycle building, and to anyone searching for a unique, and truly custom-quality bicycle. By far the most expansive array of designs and detailing is found in the bicycles that I am currently building.
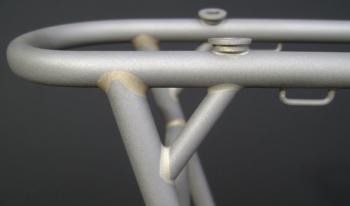
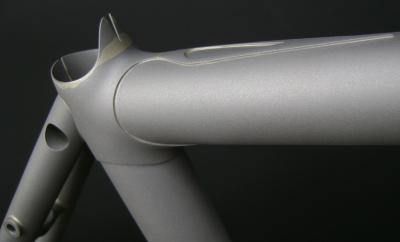
High levels of craftsmanship and performance are all about refined details. As a consumer, the more you understand about details of design, the better you may piece together the parts of the puzzle that ultimately comprise both quality and performance. Within this integrated-fastback design of an Ultra-Level frame design there are a multitude of details that are integral to a high caliber of craftsmanship. (The work on this seat cluster is cleanly executed, but not yet well enough. There is still some work to do.)
The best way to describe some of the multitude of details that comprise my own unique approach to building custom bicycles is to illustrate specific details that represent my participation in their execution. Its extremely common that I am asked to provide pictures of individual models of the bicycles that I offer, as if a picture of a complete bicycle is in some way going to be a means of comparison, or from which a full measure of its performance may miraculously be deduced. That isn't going to happen, but a series of photographs, accompanied by descriptions of the refined details that represent my own work, can quite clearly illustrate their unique nature. (I am going to present a few photos of complete bikes in this website, but none of the photos will faithfully or fully represent the model of bike with which it is associated. The variations in rack and pannier design, lug design, fork crown design and the design of many other bicycle frame parts that I create individually, along with variations in paint and finish, is limitless.)
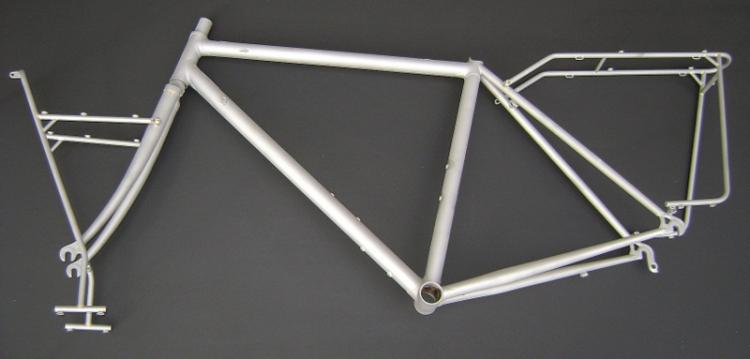
One bike frame and racks that I have chosen to photograph is of a Randonneur Lite 700 touring bicycle. The frame, Hummingbird IFT racks and the Hummingbird IFT panniers (not shown) that I build, and that will be used with the bike, are my part of the equation of creating a high-performance touring bicycle. Since I don't paint the frames or racks, I think it best to show what's below the surface of the paint as that's where the real story of the intricacies of the hand-building process are most readily seen (but only up-close).
One bike frame and racks that I have chosen to photograph is of a Randonneur Lite 700 touring bicycle. The frame, Hummingbird IFT racks and the Hummingbird IFT panniers (not shown) that I build, and that will be used with the bike, are my part of the equation of creating a high-performance touring bicycle. Since I don't paint the frames or racks, I think it best to show what's below the surface of the paint as that's where the real story of the intricacies of the hand-building process are most readily seen (but only up-close).
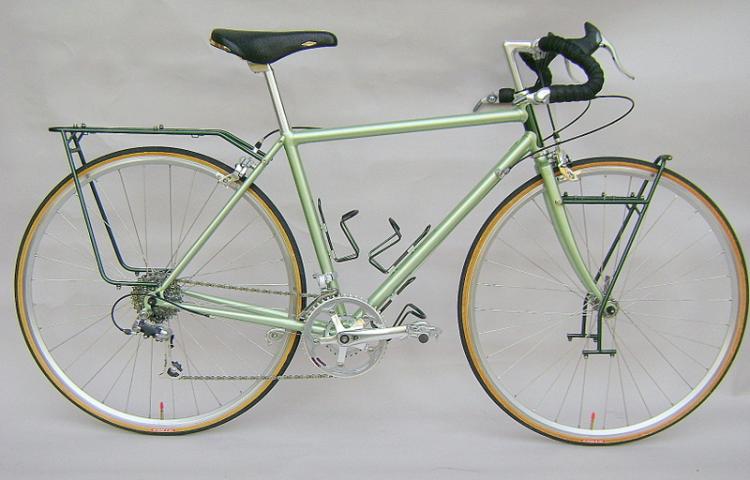
Even from up close, you really can't see what separates this bike frame and racks from all others. Putting paint, and an array of components on it, still will not provide much insight in to its design and execution. But drawing a much closer look on dozens of different details of the frame, racks and the panniers which will be mounted to the racks, will express a radically fuller story of design, craftsmanship and performance. If you are to learn of what widely separates the best from the rest, you have to get below the surface.
My point in taking the photograph of the frame and racks is simple: it reveals almost nothing of what I do in relation to the design and execution of a touring bicycle, with the exception of the custom-fit racks. Even from a short distance every bike that I build looks very similar to all of the others, so I see no point in taking photographs of complete bikes from a featureless perspective. Everything of importance, especially in touring bikes, that is combined to create quality and performance in one of my bicycles is found in the dozens and dozens of small details that can only be revealed through broad descriptions, or through photographs that reflect the critical designs and highly refined detailing that sets my work apart from all other builders.
What is also very important to understand, for any cyclist who is searching for the details to somehow measure or compare one bike to another, is that in almost all other custom touring bicycles, there are no design details to compare and there is no custom work or quality. For instance, with TIG-welded steel frames, no matter how closely you look at a them, there are no refined details, only unfinished, industrial-grade workmanship of the lowest order. Even in very finely made fillet-brazed frames and touring bikes, you're not likely to see any true custom parts, work or design. You especially will not see anything but woefully ordinary off-the-shelf racks and panniers, but it is advanced design in racks and panniers that must be integrated into an overall design to elevate the performance of a custom touring bike, potentially. It is really only in the rare lugged frame that you are likely to see much custom work, but as with the best of fillet-brazed frames, you will likely find few custom details and nothing to elevate the performance of ordinary racks and panniers in a custom bicycle. Almost all bikes lack any kind of design or details that will truly elevate them above off-the-shelf production bikes.
What is also very important to understand, for any cyclist who is searching for the details to somehow measure or compare one bike to another, is that in almost all other custom touring bicycles, there are no design details to compare and there is no custom work or quality. For instance, with TIG-welded steel frames, no matter how closely you look at a them, there are no refined details, only unfinished, industrial-grade workmanship of the lowest order. Even in very finely made fillet-brazed frames and touring bikes, you're not likely to see any true custom parts, work or design. You especially will not see anything but woefully ordinary off-the-shelf racks and panniers, but it is advanced design in racks and panniers that must be integrated into an overall design to elevate the performance of a custom touring bike, potentially. It is really only in the rare lugged frame that you are likely to see much custom work, but as with the best of fillet-brazed frames, you will likely find few custom details and nothing to elevate the performance of ordinary racks and panniers in a custom bicycle. Almost all bikes lack any kind of design or details that will truly elevate them above off-the-shelf production bikes.
Highly Customized Lugs, Fork Crowns and Racks
Custom-Quality Touring Racks
As this bike is set up with a full compliment of components, very little is revealed about its quality and performance. Through taking a much closer look at design details, and by developing a broad understanding of rack/pannier system design, the performance of the bike will slowly come into focus.
The first point of departure in my work, when compared with any other
custom builder in the world, is in the advanced designs and extreme
custom nature of the racks and panniers for this bike. The racks are
not just custom-fit to the bicycle frame, but also are designed in many
ways as no other racks are.
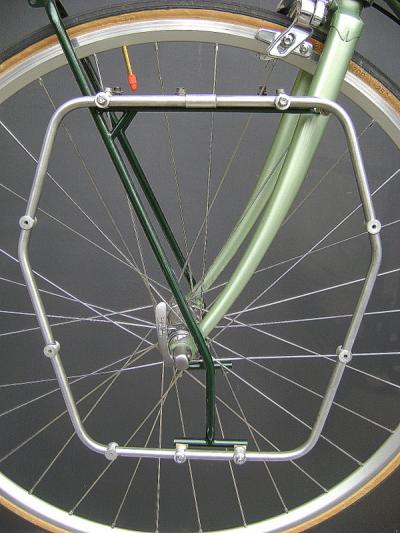
The high-performance Hummingbird IFT Mid-Mount Front Rack and the Hummingbird IFT Solo Panniers that are used in the design of the bike weigh a total of 28 ounces. Some of the weight loss in the rack/pannier system, and many of the 120-plus custom parts are part of the tubular-aluminum internal pannier frames and the parts used to mount the frames and panniers to the racks. There is a lot of work, and high levels of performance, in refined details and design.
Almost no over-the-counter metallic parts and fittings are available in building the
racks and panniers that I design, with the exception of parts like zipper pulls and
common screws and nuts. Within the Hummingbird racks and the
Hummingbird tubular aluminum pannier frames for this particular bike I
hand-made more than 124 custom parts of 17 different types. Every part
that is visible, and that is silver brazed on to the racks, is hand-made
either by a machining process using a milling machine or a lathe, or
both, or through other means of fabrication. All of the custom parts
are purely functional in nature, and are part of a process of refinement
that contributes to a much higher level of performance than that which
consumers may fin in any racks in the world. A large part of the
refinement in the execution of the Hummingbird racks, which represents
far more than just achieving the highest levels of craftsmanship, is
geared toward weight reduction, extremely high levels of rack/pannier
stability and an overall performance-to-weight ratio that is in very
different dimension when compared with any other racks. The Hummingbird
front and rear racks weigh 272 and 371 grams, respectively (9.6 and 13
ounces). They are quite lightweight, but more importantly, they are
very lightweight and at the same time much more rigid than is common in
racks as a result of their unique integrated triangulation. In
addition, each rack has been designed with an integrated pannier
mounting system, in which each part of the system is carefully machined
and then silver brazed in place on the racks. The system provides
unparalleled strength and rigidity that also makes the mounting of the
panniers much more stable, and which makes it possible for the
Hummingbird panniers to be extraordinarily lightweight.
The craftsmanship of the racks is also unique. All ATS racks are true
fillet brazed racks, with each rack joint carefully and very smoothly
filed, sanded and blended into each tube to make a smooth, seamless
joint. Even though these racks will have a very thin layer of paint,
just as in the bicycle frame, there will be absolutely no trace of
sanding marks, or any other blemishes in their workmanship that will be
visible in the finish. Every hand-made part that was machined to be
brazed to the racks was carefully prepped before assembly to remove any
marks of machining, and then carefully sanded and polished afterward.
The work is extremely clean as this is a custom-built bike, and
consequently requires custom-built quality.
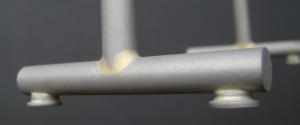
I used to execute three different levels of fillet brazing in the racks. I no longer make racks with the lowest level of work. This Hummingbird rack features mid-level fillet brazing, which is simply one of the foundations of high-quality craftsmanship in racks.
Another display of clean workmanship in racks. In my mind, in any quality bicycle, the quality of racks should be on par with the quality of the frame.
One of the most unique elements of the Hummingbird custom racks used
with this Randonneur Lite touring bike is in the time that it takes to
create something that is truly exceptional. On the surface the racks
look very clean and simple. But 120-plus hand-made parts (including the
panniers), and the very finest craftsmanship takes a lot of time to
execute. The systems are actually very complex in their details and
execution. In the time that it took to custom build just one rack and
one pair of panniers in the set, two or three TIG-welded, steel-tubing
frames that are built in the United States, and that will be sold in the
$2000 to $3000 price range, can be built. Welded bicycle frames, by
comparison with the ATS racks, are extraordinarily crude, and they will
also afford absolutely no special advantage, performance-wise (bicycle
builders all have access to the same types of tubing) when compared with
other bicycle frames. The Hummingbird racks racks and panniers are in
their own dimension, performance-wise, and will greatly increase the
overall performance of a touring bicycle through great reductions in weight and substantial increases in rack/pannier stability, along with precise gear
distribution.
Custom-Detailed, Custom-Quality Frames
The Hummingbird Lite 700 frame that I've chosen to take some detail photographs of, even though it's pretty common compared with what I am building these days, is far more custom-detailed, and in many ways is truly unique, when compared with any bicycle frames that I have ever seen in the world of custom frames. As in the racks, the best way to illuminate the many facets of a multitude of details in one of my frames is to show them in photographs, unpainted, and to explain some aspects of design which make up a custom frame that is truly custom-designed to individual tastes and performance requirements.
Some photos of the lug designs were sent to the person for whom the bike was being built. This is one of the photos showing the hand-shaped lug add-ons on the front of the head tube.
When the stone inlays were made and the frame was brazed and partly cleaned up, I shot some more photos. There was still plenty of edge filing to do on these lugs.
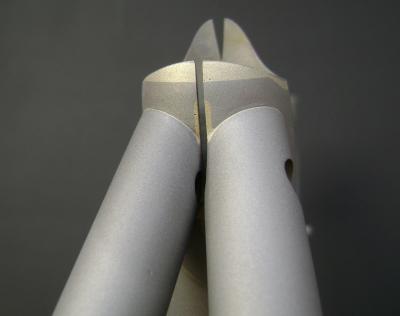
The Hummingbird IFT racks and panniers are, at least from what I have seen over the past 40 or so years, extremely hand-made and elaborately detailed, but the bicycle frame for this particular custom bike, in many ways is just as unique. This particular frame is being built for a bicycle that I'm building for a customer in Minnesota, and with the exception of some stainless parts and dropouts that I'd normally use, it's a Signature version of a Randonneur Lite 700 (and with narrower-than-normal tire clearances). Actually, it's kind of a cross between an Ultra- and Signature-Level frame, and as such it means that all details of the frame are completely up for grabs, design-wise. Beyond the basic design of the frame, every small detail in the execution of it starts with my initial drawings and first sample lugs that I photograph and send to the person for whom the frame is being built. Every individual aspect of design, from the elaborate lug designs to the type of fork crown used in the frame, and to the crown's design and execution, are part of a purely custom-design process. Every Hummingbird frame is completely different from any other one. The design of the bottom bracket shell from one frame to the next is completely different. The same goes for the fork and stay ends. I use many different types of seat clusters in the frames. Some utilize side-mounted stays, and some have integrated fastback stays, but regardless of their basic design, each will be dramatically different in its individual execution.
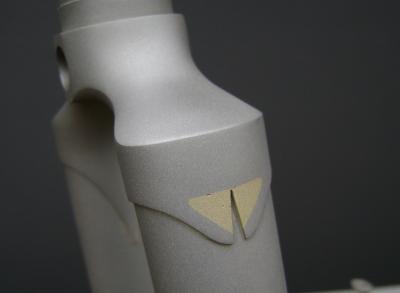
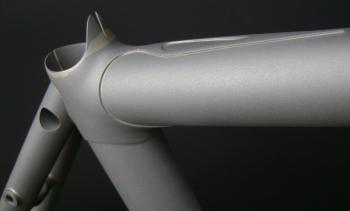
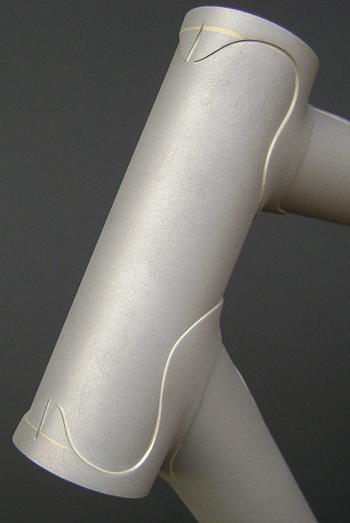
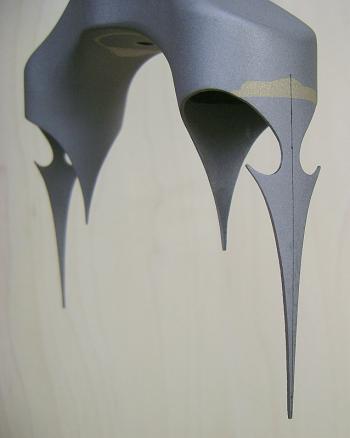
I eliminated the window in the fork crown socket and filed a V-shaped notch in it. This design motif appears in the seat lug, head tube lugs, fork crown and bottom bracket shell bringing a level of design continuity to the frame. I filled in the lug socket window with brass, opposed to welding it shut, to show how this detail is executed.
Each Signature-level frame in any bike model is extremely different from one bike to the next, but what they all have in common is that they draw upon a valuable tradition that is thousands of years old and that has penetrated every corner of the globe and nearly all cultures. There was a time when even the simplest of utilitarian devices or objects was creatively ornamented. Imaginative self expression was artfully painted on, woven into, etched upon and hammered into the objects of everyday living. That tradition, ever diminishing toward extinction within our own culture, is integrated into each of my bicycle frames. They are not just merely tools that are crudely made, aligned with a singular function as so many bicycle frames are, they are also meant to be pleasing to look at and embellished with a bit of imagination.
Highly Customized Lugs Designs
A good place to start in this particular frame is in the design of the three main lugs: the upper and lower head tube lugs and the seat lug, which is the lug within the integrated-fastback seat cluster design. The lugs have a very distinctive shape which has little in common with any stock lugs that I have ever seen. This very unique, distinctive form established the overall design of a bike frame, thematically and aesthetically, as it influenced the design of the fork crown and the bottom bracket shell designs as well. I didn't know it at the time I designed the lugs or when I started making them, but the spear-like shape of the lugs and the narrow V-shaped notch that I cut and filed into the lugs, are complimentary forms and similar to ones that have been stuck inside my my head nearly all my life. Eventually, as I cut and filed their elongated form into a final shape, I realized that it is very clearly rooted in African art. As this realization came into focus I couldn't help but recall, and wryly smile a bit, that my initial introduction to African art was deeply rooted in my grandmother's basement in a seemingly bottomless collection of National Geographic magazines, which I should probably note is also the initial source of my lifelong interest in and study of, anthropology, and in the ever-fascinating study of breastology, a truly seamless and beneficent merging of art and science.
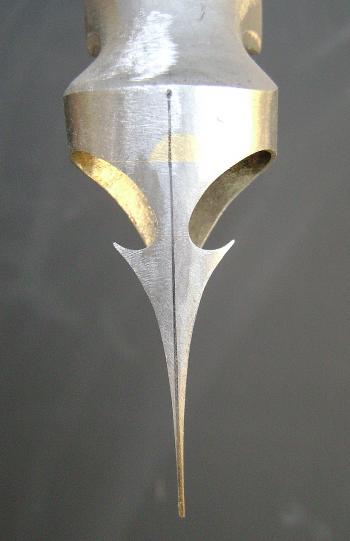
The elongated lug form with a V-shaped notch coming into focus. The Henry James seat lug from which the custom shape is created is actually flat at the top as it comes out of the box. The shape in the upper part of the lug with the notch, is completely hand-formed by brazing silver to the top of the seat tube, that extended through the seat lug in building the frame, and by then hand-cutting the outside shape with the V-shaped notch.
The final form when the frame has been painted and the Parrot Wing Jasper inlay has been attached with epoxy resin. The bifurcated form, created by the V-shaped notch in the upper part of the lug, really grew on me as this design motif was transferred to other parts of the frame.
But back to the lugs. They are a hand-made and a one-of-a-kind design
which began as stubby, completely indistinct Henry James Mountain Lugs.
They were transformed, by in this case brazing tubing to sections of
the lugs that I had lopped off squarely, and by then very slowly and painstakingly
hand-shaping them into their delicate, elongated form. Within each lug
is a very carefully shaped cut-out which acts as a setting to which gem
stone inlays (made of Parrot Wing Jasper, from Mexico, in this case) are
added after the frame is painted. As I work on a frame, I place a lot
of effort into shaping lugs into very clearly individual forms to give
each bike frame a character of its own, and to provide each of my
customers with something that is special and a frame that is very
distinctively unlike others.
The V-shaped notch was used in seven different places in the frame. Brazing it, and keeping it clean and free of excess brazing silver, was at least to me, very difficult. But it was necessary in the overall design of the lugs to compliment a very clearly African art pattern. (And, yes, I did clean it up more.)
The design in its final form. It was also not the easiest to paint, but it came out reasonably well in the end. It was a fun process for me to develop the design and then try to execute it cleanly.
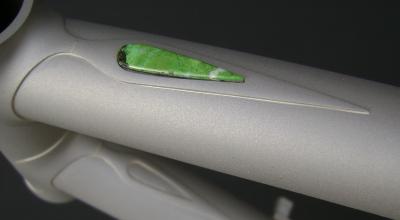
I like to use colorfull stones as an accent on frames, and I have three
frames that I'm working on at the moment that have gems set into the
lugs. They can provide a lot of character within a very small space and
work nicely as a contrast to set off the paint of a frame. Also
pictured are the asymmetrical head tube lugs of a frame that is awaiting
to be brazed up for a customer from Iowa. The stone accents in
these lugs are of turquoise and black agate. The lugs themselves bear
no resemblance to their original form, being altered with hand-shaped
add-ons, beyond recognition. These lugs will go through one last round
of prep work before they are brazed on to the frame. Lug edges will be
checked and touched up to ensure relative uniformity in thickness where
it is desired and they will receive a last treatment of blacksmithing (I
mercilessly beat on them in all sorts of ways) to ensure a close
lug-to-tube fit. I should probably note that the dual points that I've
created in the lugs on the rear side of the head tube are a design motif
that is part of the overall composition of the frame design, and that
it is repeated in the fork crown, bottom bracket shell and at the front
side of the seat tube within the seat cluster.
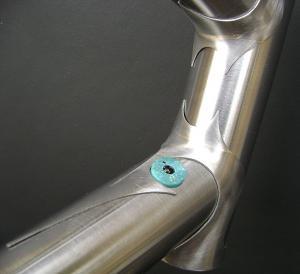
There are a lot of interesting shapes in nature, from which I like to draw design ideas, that we pass over with little thought or reflection. The points, on the rear side of the head tube in this lug design, kind of remind me of the pectoral fins of some sharks (when the sharks are agitated and they drop their fins before they attack). Using this shape is all part of keeping lug, and bicycle designs, interesting.
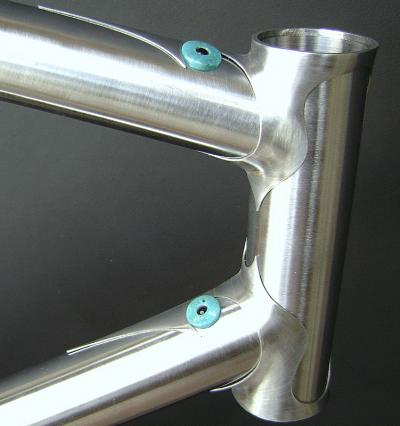
I did not have the proper tooling to make the turquoise stone accents for the frame, so a talented, local jewelry artist and a person attracted to stones as I am, James Rynevaan, machined the stones for me.
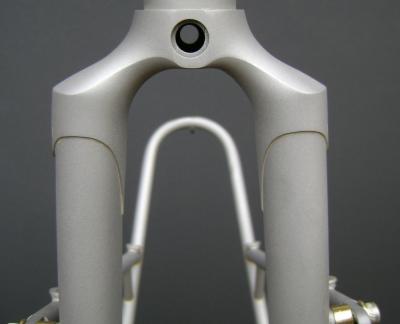
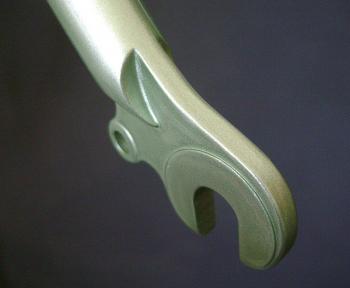
Altered and Refined Fork Crowns
The fork crown of the Randonneur Lite frame was given similar treatment as the lugs in transforming it into an interesting shape. Starting from a very crude casting that has no perceptible intentions in its design, it was completely reshaped to give it very distinct, graceful lines.
It may be difficult to see in some relatively simple lines, but there was a lot of work in this crown to make it unique. It took some effort to make the shape very clear, crisp and distinct, and I had to be awake to do it as both the inner and outer sides of the blade sockets were given completely new forms. The triangular windows in the blade sockets were filled (in this case with brass to illustrate the work in this website). Then the casting edges were very carefully thinned and squared-up to emphasize their outline, and once again the V-shaped motif was used to give dimension to the overall form of the crown and maintain a certain continuity in the overall design of the frame.
It may be difficult to see in some relatively simple lines, but there was a lot of work in this crown to make it unique. It took some effort to make the shape very clear, crisp and distinct, and I had to be awake to do it as both the inner and outer sides of the blade sockets were given completely new forms. The triangular windows in the blade sockets were filled (in this case with brass to illustrate the work in this website). Then the casting edges were very carefully thinned and squared-up to emphasize their outline, and once again the V-shaped motif was used to give dimension to the overall form of the crown and maintain a certain continuity in the overall design of the frame.
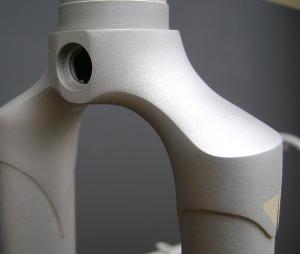
I can't help but think that there are some graceful lines that were shaped into this crown. It is in such a different realm of design when compared to welded forks with unicrowns.
I just stuck this photo in because I like it. At least in my mind it kind of accentuates a sense of form in thoughtfully crafted bicycle frames.
I should emphasize the fact that I couldn't help but think as I was
building the frame, that I was working a couple of levels above my pay
grade, when I was silver-brazing the crown and other parts of the frame
which included the notch. Most of the work was routine, but to fully
braze the V-shaped notch, and at the same to keep it completely free of
any excess silver, was to say the least, difficult. But it's all part
of the ensemble of work that goes into creating a bike frame of clear
individuality and distinction, to set it apart from all others.
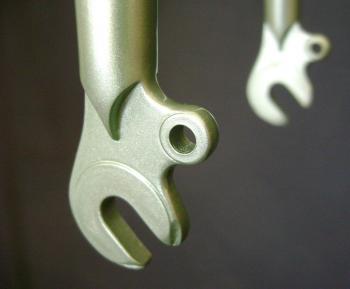
A photo of a highly altered fork crown for an RD/EX Ultima Tourer frame in which a long, stylized arrowhead lug pattern was applied to the fork crown. It is pretty close to being ready to braze. This particular crown was brazed in a fork of the "Blackbird" bike that is shown in this website. The copper "Blackbird" plate was silver soldered to the top tube of the frame.
This crown started from the same stock crown that is in the two photos near the top of this page. It is for an Eclipse 700 frame. At this stage the crown is being roughed out. As you can see, it is not nearly symmetrical at this point. Although it is difficult to see in this photo (nice job, Bob), the crown is actually much smaller than the one to its left. Both crowns look big, but they'll be swallowed up, size-wise, when they are brazed to long fork blades. The highly stylized arrowhead pattern of the crown matches the three main lugs of the bike frame.
Greatly altering fork crowns is something that I do as a common practice. Pictured are two crowns that I've got in the mix at the moment and that are being roughed-out. One is for an individual in Wisconsin and the other for a customer in Illinois (there must be something in the water in the Midwest). The crowns are being made to match the lug patterns in an Eclipse 700 Hybrid Performance model and a touring bike, the RD/EX 700 Ultima Tourer. While both crowns are of essentially the same design, they are being executed quite differently. The crown for the Hummingbird fork is much smaller than the very broad crown (to provide wide tire clearances) of the Ultima Tourer. Consequently, the highly stylized arrowhead-shaped add-ons in the blade sockets of the crowns are of very different overall dimensions to be proportionate with the size and shape of the crowns.
Perhaps it's worthy of noting, although it may be just me or my lack of ability, but I find any bilaterally symmetrical form, such as these arrowhead-pattern shapes, to be difficult to create. Hand-shaping lugs with, more or less random, patterns of cut-outs and curves, as custom lugs so often can be, are quite easy to execute and I can do it in my sleep. But a simple design in which two delicate forms are juxtaposed, and must be very, very similar in form so as to not betray the symmetry of the overall design, now that's a shape that can be difficult to accomplish. It probably doesn't help that I usually drop a lug or crown four or five times when I'm working on it, bending the hell out of the delicate shapes each time. But nonetheless, to make life easier for anyone working on such forms I'd suggest always using a center line and breaking each half of the form into visual sub units (I visually break up the arrowhead lugs in to a series of triangles).
Vast Range of Seat Cluster, BB Shell Designs and Tip Designs
Highly Refined Seat Clusters of Many Designs
Back (Why is it that nearly everything points backward in my life?) when I was a teenager and first finding my way around in the world of custom bikes, one of the signatures of many custom frame builders was the design of the seat clusters (the style in which the seat stay ends, seat post clamp and the top of the seat lugs are designed and finished) of their custom frames. This "signature" design was often repeated from frame to frame. Then and now, there are many possible designs, which are divided into two basic groups; those with side-mounted seat stays and those with a fastback style in which the seat stays are brazed to the rear side of the seat tube lug (virtually all bike frames were constructed with lugs way back then). The side-mounted stay design is executed in many different ways including those in which the stays are mounted directly to the sides of the seat lug. There are also versions of the side-mount design, called either the semi-wraparound or full-wraparound, in which the ends of the stays terminate in the top, forward side of the seat lug, partially or fully wrapping around the lug. Side-mounted stays are sometimes fluted in various designs and sometimes they receive a flat cap at their ends. There are many, many different styles and variations of the side-mount design.
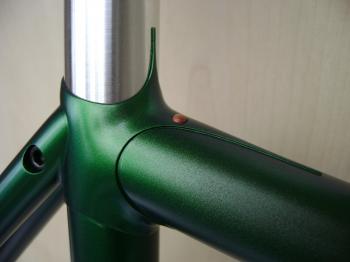
An integrated-fastback design in a Standard-Level frame. This is a fairly recently built frame. It has a smaller binder-clamp screw compared with the frame to its right. This screw, located in the right-hand seat stay, is used to clamp the seat post tightly in place.
Another view of the integrated-fastback seat-cluster design.. This is from an older-style Standard-Level frame and was the last frame to bear my signature on the down tube of the frame.
Less common are seat stays that terminate on the rear side of the seat
lug; the fastback design. And within the fastback design are many
styles, some in which the seat stays terminate against the seat post
clamp in the lug (external fastback) and some that integrate the seat-post clamp
in the ends of the stays, which is called the integrated-fastback
design, which is the style that I create in a wide variety of ways in my
frames. Regardless of the style of attaching the seat stays in the
frame, each could, especially if they are very creative in their basic
design, give a frame a sense of style, individuality, flair or even
elegance if executed in a highly refined manner. Whatever the design,
few bicycles built today, and virtually none that are welded, has a seat
cluster design that is distinctive or refined.
Many things have evolved in bicycle design and fabrication through the years. In the succeeding four decades since I was first introduced to custom frame building, as bicycle building on the whole has become more mercenary, and eliminating much of the work in building frames has become a predominant goal, frame design has seen many changes. As the tubes of more and more bike frames are adjoined by means of welding, and fewer and fewer are brazed, industrial-grade work is far more the norm, even in "custom" frame building. It has come to the point where very few bike frames of steel tubing are now fabricated by any means other than welding, and subsequently one significant element of style and individuality in frame building, the various unique designs of seat clusters, is nearly a thing of the past. That is, at least outside the world of custom-built, lugged-frame bicycles.
Many things have evolved in bicycle design and fabrication through the years. In the succeeding four decades since I was first introduced to custom frame building, as bicycle building on the whole has become more mercenary, and eliminating much of the work in building frames has become a predominant goal, frame design has seen many changes. As the tubes of more and more bike frames are adjoined by means of welding, and fewer and fewer are brazed, industrial-grade work is far more the norm, even in "custom" frame building. It has come to the point where very few bike frames of steel tubing are now fabricated by any means other than welding, and subsequently one significant element of style and individuality in frame building, the various unique designs of seat clusters, is nearly a thing of the past. That is, at least outside the world of custom-built, lugged-frame bicycles.

I have designed about a dozen different types of seat stay ends to be used in side-mounted seat-cluster designs. The lower four in the photo are ones that I have commonly used. They are long, fluted designs. The plug at the top is a commercially made design that I find too stubby to use.
In recent decades many custom builders of lugged steel frames have used one particular style of
seat cluster design as a sort of trademark in their frames, almost as a
mark of identification. My own approach to this part of designing a
custom bike is almost completely the opposite. I think that custom
bicycles should be highly individual and personal, so I use a wide
variety of styles opposed to one and I don't repeat any one style from
bike to bike. I also focus on a lot of nuances within each style to
forge a certain level of individuality in my frames and also as a means
of refinement. The seat cluster in my Randonneur Lite 700 example is
one of my favorites. It's an integrated fastback design, which
describes a style in which the clamping mechanism for the frame's seat
post is part of, or integrated into, the seat stays and is not an
external clamp on the rear side of the seat lug. I've always liked the
style because it is ultra-clean. It's not a commonly used design
because to execute it well includes a lot of time and a lot of work, and
anything that takes a lot of work has been extinguished from bike
building for a long time. Stylistically it is quite different from
other designs that I use, but what they all share in common is that they
require a lot of work. And, as with so many things that are
exceptional, the effort is worth the result.

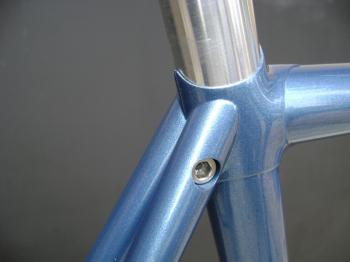
This is the rear side of the seat cluster in the Randonneur Lite 700 frame. I think that its easier to see some of the work that goes into developing a seat-cluster design if the paint doesn't obscure it. The light-colored material near the top of the seat lug, is silver. Silver is used as a filler in creating the shapes at the top of the seat lug, which is completely flat out of the box.
Again, work is more readily seen with the paint off. Still, the vast amount of hours and days that go into such a design are almost completely imperceptible, especially when the lug inlays become part of the design equation.
In any lugged bike frame, whether it is a production-level frame or a
true custom-built frame, two things greatly speed up the process of executing
the seat cluster. One is that an extremely high number of frames are
built using the existing seat-post clamp integrated into the casting of
the seat lug, and the other is that a high percentage of seat-cluster
designs, utilizing side-mounted seat stays, are accomplished by using
machined or cast plugs that are quickly and easily brazed into the upper
end of the seat stays. Many hours of frame-building time is saved
through their (plugs) use, but I literally have never used either a
commercially made plug or an existing clamp because I feel that a custom
frame should be one of refined
designs and therefore I make the seat cluster of each bicycle unique and
personal.
I also think that the seat-post clamps that are cast into lugs are generally too large, and often just plain ugly, as are the commercially made seat stay plugs. So I've just never been inclined to use them. I could
swear that the individuals who design lugs and fittings for bicycle frames
must have had their sense of taste and imagination stripped of all potential at birth. It's strange, but perhaps by some wayward
miracle, or through divine (likely for past-life infidelities) or alien
intervention, a
certain dullness of the senses appears seems to have fallen upon the individuals assigned to the task of designing these parts. Virtually all seat stay plugs, and especially those
for larger, more-rigid stays that are 5/8ths inches in diameter (as
they are on almost all of my touring frames) leave much to be desired. Let's
just say that they're usually on the blunt and stubby side. As for the
integrated clamps, they fall dismally short as well. I see them all
as abject failures when it comes to inspired design. So the starting point for
me on any frame, as I peck away at the individual steps in all of the
work that goes into creating an interesting seat cluster, is in taking a
trip to the band saw and lopping off the seat post binder clamp. And
that's pretty much the end of what's fast and fun and reckless in this
part of frame building.
There are about eight basic steps, and a lot of sub-steps with many possible variations, that I have to take in the work within the seat cluster design, whether the seat stays are side mounted or are of a fastback style, once the seat post clamp has been removed.
STEP ONE- The first step in the process is to do all the necessary design and prep work of the seat lug, which in the case of the Randonneur Lite 700 frame is very extensive as the seat lug has stone inlays have to be hand formed, and the lugs have to be closely, but not too closely, fit to them.
The very first step in transforming lugs into an interesting form, which will be the initial step in creating a seat cluster, is in lopping off the seat-post binder clamp from the rear side of the seat lug. From there, the beginning steps of shaping and thinning begin.
The rear slot, which is about four times as wide as it needs to be, is brazed up with brass, and more shaping and thinning is executed. The top point of the lug, which I temporarily shaped, just to see what I could do with such and incredibly short point (nothing), was then hacked off before a piece of tubing was brazed in place and the fun work of creating the final lug shape began.
STEP TWO- Whether a frame will have a fastback seat-cluster design, or
side-mounted seat stays, the slot in the seat lug, which will ultimately
develop the seat post clamep, is welded or brazed up (it will later be
slotted on a milling machine as a much finer slot will be sawed).
STEP THREE- In a frame that has a fastback design, plugs are turned on a lathe and then brazed into the upper end of the seat stays. For a frame with side-mounted stays, this is the point when the upper ends of the seat stays are finished. This is a very time-consuming process in which flutes will be hand-formed in the ends of the stays in a completely hollow design (although the very ends of the flutes will be reinforced with a tiny plug turned on a lathe). In alternative styles of plugs, they will be machined and also hand-formed, and then the plugs will be brazed into the upper end of the stays.
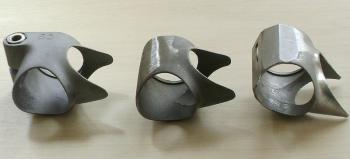
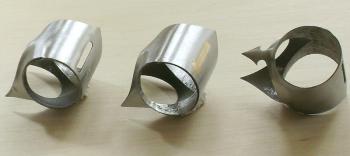
(I have designed many types of stay ends, but my favorite style is the fluted design, of which I've pictured three samples in a photo above. The lower three reflect several styles of tubular-fluted designs which can be shaped, potentially, in many different ways: pointed, rounded, asymmetrical, symmetrical, long fluted, short fluted and on and on. The fluted design at the bottom is for a semi-wraparound side-mounted design within a seat cluster. In the middle of the examples in the photo is a long, pointed, symmetrical fluted stay end that is in the form of a plug that I machined and also hand formed. I really like this style (long, pointed, fluted) of stay end and am using it in the Eclipse 700 frame I'm building up that has the asymmetrical lugs with turquoise and black agate accents. Above it is a hand-sculpted stay end, which is a very unique approach to design. As in any sculpted form, the possibilities are endless. And at the top is a commercially machined plug that is, in this case not too stubby, but nonetheless is made for speed of construction and not for beauty or sleekness of form. As with any of the commercially made plugs, it's a poor fit on a custom frame.
STEP FOUR- In a frame with a fastback design the plugged stays are now machined mitered on a milling machine, both stays at once in a specially designed fixture, to fit the rear side of the seat lug. There are many sub-steps in this process to create a very close, hand-fit between the miter in the seat stays and in the seat lug. Also, there are steps taken to ensure that the seat stays are as close to each other as possible, so that the seat post binder screw is barely visible from the rear side, in the finished fastback design. I try to make this design as clean and sleek as possible.
In a side-mount design this is the time when a seat post binder clamp is machined on a lathe, or is both turned on a lathe and hand-formed. When it is completely fabricated it will then it be brazed in place on the rear side of the seat lug. Regardless of the individual style of the clamp, of which there are many that I use, it will be as small as is practical so that its appearance won't be obtrusive in the overall design of the seat cluster, and it will have a blind side. A blind clamp is one in which the binder screw's head is visible on one end (the right-side end) of the clamp. The opposite end of the screw absolutely does not protrude through the clamp, which is the blind end of the clamp. If it were visible or to protrude, it would be an indication of funky work and not in the nature of the upper levels of frame building.
(I've made many different types of clamps. Some are just simply turned on a lathe from steel rod, but others are machined in rectangular bar stock and then hand formed. As there is variation in their design there are differences in how they may be brazed in place on the rear side of a seat lug, and then finished. I'll show a few custom-made clamps. I should probably note that they are about half the size, or less, than some seat clamps that will be part of a cast lug.)
STEP FIVE- There are a number of sub steps that lead up to step five, but this is when the seat stays are brazed in place, fastback-style, or side-mounted to the seat lug as the rear triangle of the frame is completed in its rough form. At this stage, some of the initial cleanup work in the seat cluster is finished.
STEP SIX- After alignment procedures are taken care of, the seat lug is then finished on top. In this step in the Randonneur Lite 700 frame, in which I shape the top of the seat lug, I'll replicate the V-shape notch design that is executed in the lugs on the forward side of the head tube in the frame. The bifurcated shape, and V-shaped notch in the top of the seat lug is actually formed in the seat tube that protruded through the seat lug as the frame was being brazed. The lug itself is actually flat on top and has to be completely built-up to create the form. There is a lot of work involved in creating this design as silver has to be built up on the tube and then the shapes are hand-formed. At the same time, the form that is shaped (this is almost completely file work) into the top of the lug is also thinned to match the thickness of the other two lugs in the frame, which are quite thin at their edges (about .025-.030). To me, the design of a seat cluster, and particularly the way in which the seat tube is finished, is and important part of an overall design of the frame. The design must reflect a sense of continuity. As it is shaped and finished, the top of the seat lug, at least in my mine, should be consistent in detail with the design of the other two main lugs, fork crown and bottom bracket shell. This design consistency is simply part of the basic design of my frames.
STEP SEVEN- Once I've completed most of the work in shaping and finishing the top of the seat tube lug, I then clamp the frame into a vise on the table of my milling machine, and execute all of the drilling, threading and boring in the top of the seat stays (the plugs that I brazed into the stay ends provide the structure necessary) that make up the seat post clamping mechanism of the fastback design.
STEP EIGHT- With the frame clamped on to the mill table the last of the eight basic steps is completed by slotting the back side of the seat lug with a very narrow (I'd guess about .040), fine-toothed jewelry-saw blade. This very fine slot allows the clamp screw to compress the seat lug around the seat post in the frame. It ultimately holds the seat post very firmly in place. And once this last step is completed all of the final clean-up work begins.
The whole process may seem to be relatively simple, but within a frame that is intensively hand-made, with extremely complicated lugs as in the Hummingbird frame that has stone inlays, it can literally take days to complete. On bike frames that are welded, or even in production-level lugged frames that incorporate cast or machined plugs in the top ends of the seat stays, the process of completing all the work in this area of the frame can be executed in minutes, although far more minutes on production-built, or many custom lugged frames. It can take an extraordinary amount of time to execute the work in a highly refined manner, but I feel that it is a routine and essential part of the higher levels of custom frame building and it's my responsibility to put some passion and thought into this area my work.
STEP THREE- In a frame that has a fastback design, plugs are turned on a lathe and then brazed into the upper end of the seat stays. For a frame with side-mounted stays, this is the point when the upper ends of the seat stays are finished. This is a very time-consuming process in which flutes will be hand-formed in the ends of the stays in a completely hollow design (although the very ends of the flutes will be reinforced with a tiny plug turned on a lathe). In alternative styles of plugs, they will be machined and also hand-formed, and then the plugs will be brazed into the upper end of the stays.
(I have designed many types of stay ends, but my favorite style is the fluted design, of which I've pictured three samples in a photo above. The lower three reflect several styles of tubular-fluted designs which can be shaped, potentially, in many different ways: pointed, rounded, asymmetrical, symmetrical, long fluted, short fluted and on and on. The fluted design at the bottom is for a semi-wraparound side-mounted design within a seat cluster. In the middle of the examples in the photo is a long, pointed, symmetrical fluted stay end that is in the form of a plug that I machined and also hand formed. I really like this style (long, pointed, fluted) of stay end and am using it in the Eclipse 700 frame I'm building up that has the asymmetrical lugs with turquoise and black agate accents. Above it is a hand-sculpted stay end, which is a very unique approach to design. As in any sculpted form, the possibilities are endless. And at the top is a commercially machined plug that is, in this case not too stubby, but nonetheless is made for speed of construction and not for beauty or sleekness of form. As with any of the commercially made plugs, it's a poor fit on a custom frame.
STEP FOUR- In a frame with a fastback design the plugged stays are now machined mitered on a milling machine, both stays at once in a specially designed fixture, to fit the rear side of the seat lug. There are many sub-steps in this process to create a very close, hand-fit between the miter in the seat stays and in the seat lug. Also, there are steps taken to ensure that the seat stays are as close to each other as possible, so that the seat post binder screw is barely visible from the rear side, in the finished fastback design. I try to make this design as clean and sleek as possible.
In a side-mount design this is the time when a seat post binder clamp is machined on a lathe, or is both turned on a lathe and hand-formed. When it is completely fabricated it will then it be brazed in place on the rear side of the seat lug. Regardless of the individual style of the clamp, of which there are many that I use, it will be as small as is practical so that its appearance won't be obtrusive in the overall design of the seat cluster, and it will have a blind side. A blind clamp is one in which the binder screw's head is visible on one end (the right-side end) of the clamp. The opposite end of the screw absolutely does not protrude through the clamp, which is the blind end of the clamp. If it were visible or to protrude, it would be an indication of funky work and not in the nature of the upper levels of frame building.
(I've made many different types of clamps. Some are just simply turned on a lathe from steel rod, but others are machined in rectangular bar stock and then hand formed. As there is variation in their design there are differences in how they may be brazed in place on the rear side of a seat lug, and then finished. I'll show a few custom-made clamps. I should probably note that they are about half the size, or less, than some seat clamps that will be part of a cast lug.)
STEP FIVE- There are a number of sub steps that lead up to step five, but this is when the seat stays are brazed in place, fastback-style, or side-mounted to the seat lug as the rear triangle of the frame is completed in its rough form. At this stage, some of the initial cleanup work in the seat cluster is finished.
STEP SIX- After alignment procedures are taken care of, the seat lug is then finished on top. In this step in the Randonneur Lite 700 frame, in which I shape the top of the seat lug, I'll replicate the V-shape notch design that is executed in the lugs on the forward side of the head tube in the frame. The bifurcated shape, and V-shaped notch in the top of the seat lug is actually formed in the seat tube that protruded through the seat lug as the frame was being brazed. The lug itself is actually flat on top and has to be completely built-up to create the form. There is a lot of work involved in creating this design as silver has to be built up on the tube and then the shapes are hand-formed. At the same time, the form that is shaped (this is almost completely file work) into the top of the lug is also thinned to match the thickness of the other two lugs in the frame, which are quite thin at their edges (about .025-.030). To me, the design of a seat cluster, and particularly the way in which the seat tube is finished, is and important part of an overall design of the frame. The design must reflect a sense of continuity. As it is shaped and finished, the top of the seat lug, at least in my mine, should be consistent in detail with the design of the other two main lugs, fork crown and bottom bracket shell. This design consistency is simply part of the basic design of my frames.
STEP SEVEN- Once I've completed most of the work in shaping and finishing the top of the seat tube lug, I then clamp the frame into a vise on the table of my milling machine, and execute all of the drilling, threading and boring in the top of the seat stays (the plugs that I brazed into the stay ends provide the structure necessary) that make up the seat post clamping mechanism of the fastback design.
STEP EIGHT- With the frame clamped on to the mill table the last of the eight basic steps is completed by slotting the back side of the seat lug with a very narrow (I'd guess about .040), fine-toothed jewelry-saw blade. This very fine slot allows the clamp screw to compress the seat lug around the seat post in the frame. It ultimately holds the seat post very firmly in place. And once this last step is completed all of the final clean-up work begins.
The whole process may seem to be relatively simple, but within a frame that is intensively hand-made, with extremely complicated lugs as in the Hummingbird frame that has stone inlays, it can literally take days to complete. On bike frames that are welded, or even in production-level lugged frames that incorporate cast or machined plugs in the top ends of the seat stays, the process of completing all the work in this area of the frame can be executed in minutes, although far more minutes on production-built, or many custom lugged frames. It can take an extraordinary amount of time to execute the work in a highly refined manner, but I feel that it is a routine and essential part of the higher levels of custom frame building and it's my responsibility to put some passion and thought into this area my work.
Unique Fork and Stay Tip Designs
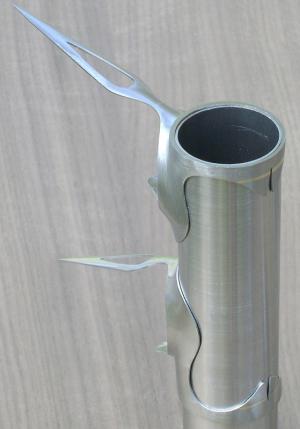
The chain and seat stay tips for the Randonneur Lite frame that I've pictured are unique. In fact, I can guarantee that there are no others like them in the world, because I developed a new design process that is implemented in the execution of these tips. The process was created so that I could use it to design a multitude of different shapes and types of stay ends. Traditionally, fork and stay ends are finished in just a few basic ways without much variation. That may be fine for production bikes, but I've always thought that true custom frames demand greater attention to detail and individual variation.
Because I've built so many touring bikes, in which structure and durability play a prominent role in design, I didn't venture too far into dropout and fork-tip design, but I'm getting there. I'm beginning to be more adventurous in my designs, as in these tips.
Another look at the same tips that were part of the Randonneur Lite design. They are unique, but not yet very adventurous compared with bike frames that are coming up in the paint schedule.
The process also has a functional advantage in that it allows the stay
tips to be brazed with silver opposed to brass. The high temperatures
of brass brazing, no matter how carefully stay ends are brazed to the
frame's dropouts, always softens up the steel in the dropouts. Brazing
with silver allows the dropouts to retain their original stiffness and
strength and it also invites customization of the dropouts themselves as
it requites less mass in a dropout design
Recently I've developed yet another process of designing tips which is even more advanced and contributes to nearly unlimited possibilities in fork and stay tip designs. Again, this latest design creates tips that can be brazed very soundly with silver.
Recently I've developed yet another process of designing tips which is even more advanced and contributes to nearly unlimited possibilities in fork and stay tip designs. Again, this latest design creates tips that can be brazed very soundly with silver.
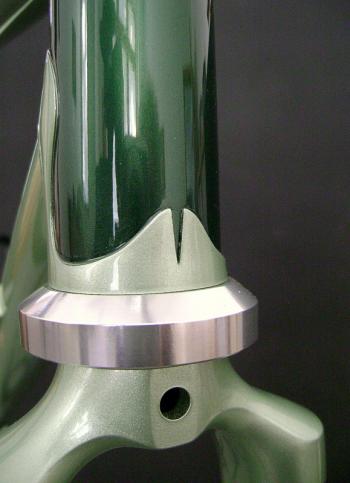
Refined, Unique Bottom Bracket Shells
One of the structural and performance advantages of a lugged frame made with steel tubing is in the increased stiffness, by virtue of the rigidity created by the mass in the down tube, seat tube and chain stay sockets, of its bottom bracket shell. The high level of bottom bracket rigidity simply means that a rider's power and energy will be more readily transferred through the frame, and will not be as easily dissipated as a result of unwanted frame flex within the bottom bracket area. High bottom bracket rigidity is a very good thing within the overall design of a bike frame. And, another good thing about lugged bikes is that custom bicycle builders can increase this rigidity without resorting to using more rigid tubing. I've always felt that it's better to create higher frame rigidity at frame joints (think of the joints, or tubing intersections, as being at the end of long levers) opposed to providing or increasing frame rigidity through the use of much harder, stiffer frame tubing. Stiffer tubing can contribute to an undesired increase in the transfer of road shock. Knowing these things, I treat the design and execution of bottom brackets with care when I'm building a frame, and often very differently than any other builders.
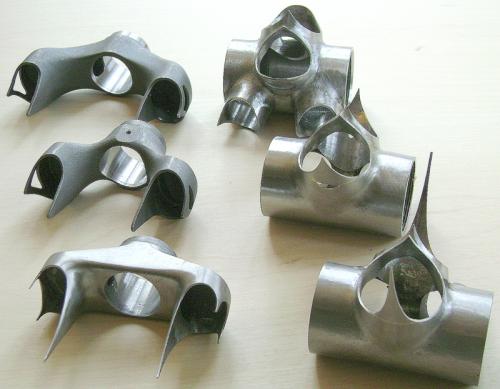
The bottom bracket shell for the Eclipse 700 is at the lower right. At the time of this photo six different shells were in various stages of being roughed-out. All would eventually take on very different forms as they were altered to be consistent with design patterns of the three primary lugs of their individual frames.
The bottom bracket shell for the Randonneur Lite follows a design scheme
consistent with other parts of the frame. To show it in a photograph
would be a bit redundant as I've shown its detailing in other photos of
lugs. But a photo of another bottom bracket shell of an Eclipse 700
bike that I'm working on at the moment can illustrate some possibilities
of design both aesthetically and functionally. Currently, I'm just
roughing-out the shell, giving it the basic shape that I want and filing
the surface throughout to remove the rough casting irregularities.
Aesthetically, it follows a Hummingbird frame design, as I've added
extremely long, narrow points to the down- and seat-tube sockets and
I'll do something similar on the outside of the chain stay sockets.
(The long points remind me of Hummingbird's beaks.)
Functionally, the points are add-ons, but if I wanted to increase the bottom bracket rigidity for this particular frame, I'd weld the add-ons in place and I would make them out of highly hardened tubing. At the same time, I wouldn't do a whole lot of thinning in either the shell itself or in the add-ons, and I could build up the joints with brass Consequently, I could extend the stiffness of the shell further out into the tubing if I chose to, and I could alter the rigidity in the joints. However, in this particular case the frame is for a 120 pound rider, and the shell is quite sufficiently rigid, therefore the add-ons are purely aesthetic. As I proceed on the shell I'll thin the socket edges very carefully, and just at the very edge of the sockets. I don't want to rob the shell of structure that is essential to its rigidity. And then I'll work the surfaces to a polished smoothness before the shell is brazed into the frame.
Functionally, the points are add-ons, but if I wanted to increase the bottom bracket rigidity for this particular frame, I'd weld the add-ons in place and I would make them out of highly hardened tubing. At the same time, I wouldn't do a whole lot of thinning in either the shell itself or in the add-ons, and I could build up the joints with brass Consequently, I could extend the stiffness of the shell further out into the tubing if I chose to, and I could alter the rigidity in the joints. However, in this particular case the frame is for a 120 pound rider, and the shell is quite sufficiently rigid, therefore the add-ons are purely aesthetic. As I proceed on the shell I'll thin the socket edges very carefully, and just at the very edge of the sockets. I don't want to rob the shell of structure that is essential to its rigidity. And then I'll work the surfaces to a polished smoothness before the shell is brazed into the frame.
Custom-Made Parts
A quick survey of the parts that I have created for my custom touring and Hybrid Performance bicycles during just the last couple of years, yielded more than 100, few of which are to be found in any other bicycles, in any form. This count does not include the wide range of stone inlays or the creative metal accents for the lugs. It does not include add-ons or other parts used in the creative reshaping of the lugs used in the frames. What it does include are the essential parts that have been developed for the wide range of lighting systems that are set up for the bikes as well as parts used in routing derailleur, lighting and brake cables. Part of the compliment of custom parts includes tabs used in mounting disc brakes along with numerous parts to refine and clean up the mounting of other types of brakes. Dozens of custom parts have been developed to be used in the mounting of custom racks in a variety of ways and to augment the function of racks through their integral mounting systems and various types of strap guides. Many parts are utilized in advancing the performance of panniers in the touring bikes that I build. Specialized parts were created to be part of unique designs of fork tips and stay ends. Some are used as refined reinforcements and to mount components to the frames in a creative way. Whatever the part, each is developed to compliment the design of a custom bicycle in a unique way.
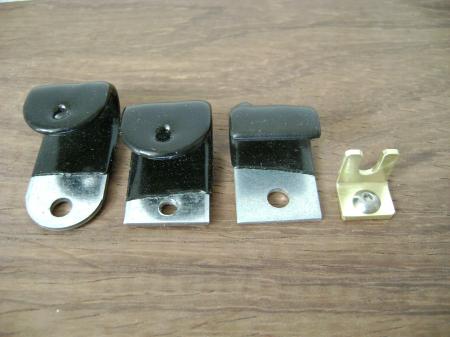
One very, very important custom part that I make is the one on the right in this photo. It is a brass fitting that is used in the Ultra-Lock mounting system of Hummingbird IFT panniers. It weights 1/7th the amount of weight of the original RBD pannier hook that is at the far left in the photo.
The reason for developing custom-made parts is simple: the
over-the-counter parts commonly used in the manufacture of bicycles,
custom or otherwise, are often deficient in their design and often fall
short quality-wise. They can be pretty crudely stamped or machined. I
think it's safe to say that far too many parts are very generalized or
common in their design, woefully uninspired or most commonly just plain
non-existent. Therefore, a functional, well-finished option often
simply has to be created. And as such, finely executed custom parts
play an integral and essential part in custom building that adds an
important dimension of refinement, structurally and aesthetically, to
truly custom-built bicycles . On their own they are, individually,
easy to overlook but added to a multitude of other other creative
features, they are simply part of an important process in which I do my
best to make something special, personal and highly distinctive for
customer that purchases a custom-built bicycle from me.
Components and Specifications
Wheel Sizes to Choose From
I'm often asked about wheel sizes, and which might be best of the common sizes, 700c (622mm BSD), 26 in. (559mm BSD), 650b (584mm BSD) or 650c (571mm BSD), for touring. I'm not completely partial to any size, but if I were to own just one bicycle it would definitely have 700c wheels. 700c is the most versatile size. By far the greatest availability of tires on the narrow end of the spectrum (20mm to 32mm) is for 700c, in both tubular and clincher tires. Availability is really very good. For paved road touring, the spectrum of 700c clincher tires that is currently offered is exceptional. For all but the most severe off-road conditions, tires of the wider, knobbier variety are also available in abundance, especially at the narrower side of the dirt-riding spectrum (32mm to 45mm) and availability is growing.
There was a time when I hoped that the triathlon size, 650c, would grow to include a much wider range of tires. But alas, the range is mostly limited to quite-lightweight, high-performance tires at the 20mm, 23mm and 25mm width. For the highest degree of touring performance a pretty wide range of quite exciting tires is still available in the 650c size. I bought a pair of very lightweight 650c wheels for use on one of my 26 in. touring bikes, and that's where I see the strength of the 650c wheel/tire size: the versatility/compatibility that it provides for touring cyclists with bikes that are designed for 26 in. wheels, and that own two sets of wheels (650c and 26 in.). The extreme performance of 650c tires/ rims combined with mid-range touring tires (28mm, 32mm and 35mm) available in the 26 in. size, along with the extremely wide range of off-road knobbies that may be found for 26 in. rims, provides tremendous performance versatility in bikes built for 26 in. wheels.
For many years I only rode my touring bike with 26 in. wheels. I really like the wheel size, but as the 1980s rolled into the 1990s and a new century arrived, I moved to more and more efficient wheels for both road and off-road touring. These days I most often ride on 23mm and 25mm tires on pavement and the versatility that I'm looking for in a singular wheel size has diminished in the 26 in. size. I likely will never use a tire over 38mm for the type of touring that I do on dirt and consequently, for my own style of touring, the 26 in. wheel size is quite limited. But couple a pair of 26 in. wheels with a pair of 650c wheels and there's more potential on a 26 in. bike. Where 26 in. wheels are strong is in the 32mm and 35mm tire range for road or mixed (riding on both paved roads and good, maintained dirt roads) touring, and for touring in extreme conditions with wider tires.
The 650b rim/tire/wheel size has never become popular or common in this country. As touring tires go, availability is extremely limited. I'd hate to try to replace a tire in Minot, North Dakota or Biloxi, Mississippi.
I've never seen great differences between the various wheel sizes. Mathematically, in terms of rolling resistance, area of tire contact patches and potential wheel strength, the differences between the common sizes is small. My rule of thumb, regardless of wheel size, is always to find the lightest, most practical combination rims, tires, tubes and spokes.
Rim / Tire Weight in Performance
When I am selecting rims, tires, tubes and spokes for bicycle touring my natural inclination is to always proceed cautiously and conservatively. In a contradictory light, I always try to use the very lightest and most efficient of these components that is practical. And that always begs the question, what is practical?
In my younger days I always rode on 32mm touring tires if I knew that I was going to tour predominantly on pavement but also would be spending a bit of time on dirt (in Wisconsin where I grew up, dirt was often crushed limestone). That hasn't changed. I generally don't like to use a tire smaller than 32mm on maintained dirt roads. But if I know that I'm going to stick to pavement I don't want to punish myself and push any more weight than I have to, so I opt for very lightweight 23mm or 25mm tires (210 to 240 grams in the 700c size). On pavement I really see no need to use tires wider than 25mm.
I started taking tours that were predominantly on dirt, and in some cases on hiking trails, in the late 1970s. I used mostly 32mm, and sometimes 35mm tires for those trips, but I was glad to see wider tires become available for some conditions when mountain bikes started to become popular in the early 1980s. Like many people I rode on big, fat 48mm mountain bike tires back then, but those tires seemed like extreme overkill. I observed that cyclo-cross racers often competed on narrow tires and deduced that the demands of competition were greater than those in the type of touring that I was doing off of pavement. So I resolved to find a much more practical option than 48mm tires for touring on dirt. In the late 1980s I first bought some new lightweight 35mm tires and then others and experimented, riding every imaginable condition I could find over a period of a couple of years. My conclusion was that 32 and 35mm tires were a much better option when I was spending most of my time on pavement, but still a significant time touring on dirt. Here in Oregon, mostly riding on National Forest roads, I encountered no conditions in which the 35mm tires were not sufficient. Overall, I greatly preferred the design of the 35mm tires (inverted tread and low rolling resistance) to any knobbies that I experimented with, especially when I knew that most of my riding time would be on pavement.
In extremely loose soil or sandy conditions its not possible to ride or tour with narrow tires (32mm or 35mm). You need tire flotation in such conditions and narrow tires just don't cut it. In very rocky conditions, it's possible to ride on narrow tires but I don't recommend them, especially as you'll likely encounter conditions in which you'll want to reduce tire pressures. But when conditions allow the use of narrower tires, I always opt for lighter, narrower tires along with narrow rims. One thing that I learned from riding a lot on dirt with 32mm tires is that they are more subject to sidewall cuts and failure if they are used with a wider rim (25mm). A few years ago I built up some wheels with 26 in. rims that are 19mm wide. They were built as a more practical wheel for riding on dirt with narrow tires. The narrow width of the rim changes the shape of the tires, so that the sidewall angle of the tires cants inwardly to a degree that the sidewalls are shielded much better than when they are mounted on a wider rim and then have a more rounded profile.
Experimentation in an extremely wide range of conditions, and the rigors of long-distance touring, have provided me with some very useful information about the nature of tires. I've found that within a very narrow range of weight and width, tires may vary widely with respect to the composition of tread materials, their puncture resistance, longevity and wear, and in their sidewall strength and resistance to cuts. Two tires that may look very similar, and weigh the same, may perform quite differently. I've found that only experience will tell what tires are the most practical.
The most practical performance balance for me when I'm touring on pavement is with tires and rims that are quite lightweight and narrow but sufficient, relative to my body weight, in terms of durability and overall wear. Within the 700c wheel size I would much rather tour on a 25mm tire that weighs 220 or 240 grams than 32mm or 35mm tires that may weigh 300grams or even 350 grams, respectively. This is especially so if the tread depth and wear potential are the same as with much lighter tires. I prefer a lightweight tube that weighs 65 grams over a tube that is 100 or 120 grams. I probably will never tour on pavement again with front panniers. So why would I build up a front wheel with 36 spokes when 28 is quite sufficient? 32 will work on the rear. I know from experience that I definitely can use narrow rims and I try to keep rim weight down as much as possible. I used to travel on 500 gram rims until I experimented with ones that weigh 420 grams. Whenever possible I keep tire pressure high. It just makes sense to me to give myself every performance advantage available. When touring bikes are set up wisely, they can be ridden in much the same way as high-performance training bicycles using the same types of components. If you think about it, 15 or 20 extra pounds of gear on a bike shouldn't shift how it is designed to a substantial degree.
Half-Step Gearing
I'm at a loss to describe exactly what half-step gearing is although I have been using it for 40 years. But I can explain why I have chosen to include it in the design of my own personal touring bikes. I have always used it because it provides more closely spaced gearing in the parts of a gear range that I want it most without having to resort to eight- or ten-speed cassettes. Closely spaced gearing is quite beneficial as a mechanism in fine-tuning a system of gearing, especially in long-distance touring, and that is why I include it in all of the touring bikes that I have built.
The way that I set up the gearing for my own personal bikes is pretty simple. I'll ride a touring bike on a flat surface loaded with a normal amount of touring paraphernalia. As I'm riding I'll determine the gear that is most comfortable to ride at a particular pedaling cadence. If that comfortable gear has a gear-inch of 74, for instance, I know that I'll want very small shifts or jumps in gears both upwardly and downwardly from that point. I also know from experience that if I pedal slightly downhill, or if I experience a slight tailwind (tailwinds are generally slight), I'll want to shift to a slightly larger gear, but I absolutely don't want there to be a large jump of something like, or near, 10 gear inches. I'll feel comfortable on a loaded bike with a jump from 74 to 79, but I don't want to go up from 74 to 83. At the same time, if conditions are basically reversed, I'll want to shift down from 74 to 70 or 68. The small jumps allow a good, comfortable cadence to be maintained. In the long run, or more accurately, over the course of a long tour, having closely spaced gearing helps cut down on knee discomfort and bodily wear and tear. I can't help but think that anything that helps with saving energy and limiting discomfort are good things.
Bicycles have so many gears these days that gear spacing is pretty good on most bikes with triple chain wheels, but a half-step system is still beneficial. Also, I should add that I never set my own bikes up with a super-wide gear range. My rule of thumb, especially on touring bikes, is that the narrower the range, the closer the gears, and therefore I try to eliminate the gears that I won't use on a loaded bike because I just don't have the power to use large gears. I know that unless I'm riding in front of a magnificent tailwind (an oxymoron in the context of touring) that I'm not likely to use a gear over 90, so I set my touring gears up accordingly. Other cyclists may like a bit wider range so one common gearing setup that I use on my custom bikes is a drive-train using a 48 x 44 x 24 chain wheel combo with a 12-32 cassette.
I also use a combination with a 46 x 42 x 24 triple chain wheel. If you access a gear chart and calculate different chain wheel/cassette cog/tire size combinations you'll be able to find one that will work well on your bike.
There are no longer, at least that I'm aware of, any front derailleurs that work with a half-step system. Consequently, I modify Shimano 105 or Sora dearailleurs when I set up touring bikes for my customers. It's simply a service that I consider necessary.
STANDARD GEARING- In the last couple of years I've had to set some bikes up with 9- and 10-speed cassettes, especially in Hybrid Performance bicycles. With a triple crankset there are now so many gears that some gear setups rival half-step gearing. The advantage with 7- and 8-speed half-step gearing is in providing closely spaced gearing, especially where it is most critical, at a lower weight and with stronger, longer-wearing chains, but we may come to a time in which all systems are set up for the use with 9-, 10- or 11-speed cassettes.
Custom Frame Components
Overview of Components
Within the base price of any of my custom bicycles is included a basic package of components. This set does not include components such as lighting systems or racks and panniers on touring bicycles. It just includes the primary components. Also, as there is such a wide range of prices and personal choices among pedals and saddles I don't include those among a basic components package either. Most of my customers ask me to provide a very specific saddle and pedals, which I just add as accessories.
There was a time when the basic package was comprised mostly of Shimano components but as some of their components evolved they became less suitable for touring bikes (like their 105 and Ultegra cranks) so these days I use components that I think are most suitable regardless of brand. When individual components among two different brand choices are available that function equally well I'll generally choose the one that has the better finish-quality of the two. It's unfortunate but there are just no components groups available among touring components, so it is essential that I mix and match components the best I can. That mix and match is always in flux as many individual components evolve with seemingly clockwork regularity. Within the range of components for my Performance Hybrid Bicycles there is even greater flux as it seems that personal choices of components among my customers varies more than in touring bicycles. But it is easier to provide a set of components in a complete group among the various Campagnolo and Shimano groups for the Hybrid Performance bicycles.
Regardless of the components chosen by any individual customer I think I can safely say that components choices are basically with few limitations. I've always felt that custom bicycles should include a custom selection of components. Therefore, if you have any particular need or request among components I'll try to do my best to meet that need. One of the things that I feel very strongly about with regard to custom bicycles is that they should be personalized, therefore it is essentially my responsibility to address the choices of components in an individual way starting with kind of a loose, basic components package and moving forward from that point. I should also add that I don't just use new, current components. I always equip bikes with current components unless I'm asked to use a vintage component that has previously been sold, but I also equip bikes with (new) components that may no longer be being sold. Some older types of components may be aesthetically more desirable, or functionally superior, to current models of a particular type of component. I'll list some of the basic components that I use.
Bars, Stems, Brakes, Shifters
HANDLEBARS AND STEMS- I'm not a big fan of the idea that drop bars are the number one choice among handlebars, without question or experimentation. There are many possible options among bars and I think that cyclists would be well served to explore some of those options, not just among the different styles of bars that are available, but also in how bars are set up with different types of stems adjusted with relation to reach and elevation. I could be wrong, but I sense that many cyclists ride bikes with drop bars and rarely place their hands on the drops. Consequently, they may be better suited to another type of handlebar. I know that if I were to set up a new bike for myself tomorrow that it would not be with conventional drop bars. Most likely, if I were to use drops, I'd set my bike up with Midge bars (that would be custom polished). Having said all that, I still set up most bicycles with Nitto Technomic bars and stems or Nitto Deluxe stems, and until I'm told otherwise those are kind of a standard drop bar/stem combos that have been set in place. This is especially true among touring bikes in which the long quill of the Technomic stems allow handlebars to be adjusted to a higher position.
BAR-END SHIFTERS- One of the Shimano components that I like are their bar-end shifters. The Ultegra bar-ends are a standard component on most of my custom bikes, Touring or Hybrid Performance. They simply perform well. However, they cannot always be used and are not always the preferred shifter, especially outside of touring. When that is the case, I provide what is requested.
INTEGRATED BRAKING/SHIFTING- I like the idea of integrated braking/shifting systems. There is something inherently cool about them in theory. But coming from a background that has almost always revolved around bicycle touring and a philosophy of focusing upon simplicity/dependability in the preparation for long bicycle trips, I've never warmed to the use of Shimano STI and Campagnolo Ergo Power systems. I've never warmed to the just-how-ugly-can-we-make-these-levers aesthetics of the systems either. Every once in a while I am asked to use the systems, and I do even on touring bikes, but I have my limits. If you'd like to use integrated braking/shifting on your touring bicycle you'll first have to convince me that it is the best choice and that it is compatible with other components to be used on the bike (cranks, derailleurs). As far as my Hybrid Performance bicycles go, that's a different matter.
BRAKE LEVERS- I wonder if making brake levers as big, ugly and clunky-looking as possible is one of the primary criteria in designing levers these days? If it is, there is success in abundance all around. As a large percentage of bikes that I send out the door are bikes set up with V-brakes I get to see far too many ugly brake levers. One of the big, clunky levers of choice these days is the Cane Creek Drop-V lever. They function just fine, and with the exception of the fact that there's just way too much to them and that their finish is far from awe-inspiring, they are a very solid lever.
When I have the opportunity to use levers that are not designed for V-brakes, I search. I find the nicest levers that I can to be part of the set of components for a bicycle. I'm not at all opposed to using levers that are no longer being made, but that are new. I look for ones that are designed nicely and that function well. I use whatever I can find and hopefully they will have polished or clear-anodized finish opposed to levers with a painted finish like some of the Shimano levers. So, if I'm building a bike for you and you have the drop on some nice levers, speak up.
BRAKES- For bikes that are set up with V-brakes I use the Avid Single Digit 7 brake as a standard. They are definitely the standard for some of my expedition bikes. And, as it has been about 15 years now that I've used V-brakes, I've warmed to their use on some types of bikes. They have exceptional stopping power, and as I've gotten better at setting them up I really don't have any complaints of them any longer.
On the other hand, I'm not very enthusiastic about some types of cantilever brakes. Many are not particularly great stoppers and the ones that do perform well are usually far too wide to fit all of my high-mount racks. If you'd like to use cantilevers on your bike, please check with me first with regard to their compatibility.
When a lot of people think about brakes for touring, their perspective is often skewed by an image that touring means carrying 40 or 50 pounds of gear on a bike. I sense that if I were thinking of lugging around 50 pounds of gear all of the time on my touring bike my mind would quite probably gravitate instantaneously to the use of V-brakes or discs. I've certainly carried 50 pounds in expedition conditions, but the vast majority of my touring miles have been spent being perched over about 15 to 20 pounds of stuff, even in expedition cycling. With lightweight touring loads, especially if you don't weigh a bunch yourself, any brake you choose will be an adequate stopper. Therefore, you may choose any brake you like as long as it provides proper clearance for the range of tires that you'll be using. In bikes that are in my building rotation in upcoming months I have two that are with Avid cable-actuated discs, two with dual-pivot side-pull brakes, some that have V-brakes and one that is to have old, restored center-pull brakes that are being custom-fit to an Encore frame. I also am building two other bikes that will be set up with vintage side-pull brakes: one with Campy Record brakes and the other with some very nice (new) Modolo brakes from the 1970s.
Hybrid Performance bicycles are generally set up with dual-pivot side-pull brakes. I don't really have any preference, brand-wise. I'm more concerned with performance and finish than any brand name. I have been asked to use Tektro brakes and have been surprised by them as being quite reasonably finished for an inexpensive brake as well as having good stopping power and modulation.
DISC BRAKES- Within the range of bicycles that I build, disc brakes are most beneficial in bikes that are designed for very serious expedition touring, like a multiple-year, around-the-world trip. Discs have one very distinct advantage in that they do not wear rims. And among disc brakes, even though hydraulic discs may be a bit better, functionally, in relation to their caliper design, I think that cable-actuated discs are possibly the better fit for touring and more trouble-free. In either case, setting up discs for the types of bicycle frames that I build, with relatively small fork blades (that are also raked) and stays, and that are brazed opposed to being welded, is not particularly easy. It has become easier since I've designed and made my own mounting tabs a couple of years ago and through developing my own process for setting up the brakes. However, it is still requires a serious effort and remains relatively difficult and time-consuming. So, if you'd like disc brakes on your bike it is something that I offer as a custom option.
Cranksets and Drive-Train Components
CRANKSETS AND BOTTOM BRACKETS- For a few years now the Sugino RD 3000T has been the standard crankset used on my bicycles for several reasons. Most notably, it is road crankset that is designed to be used with a square-tapered bottom bracket axle and is of a design that works well on frames that have bent chain stays. It's a crank that is compatible with, and is best-designed for, many of the bikes that I'm building and for the type of gearing the bikes are set up with. Also, it is of a more traditional design, stylistically, which I prefer.
After I am through setting up the cranks for half-step gearing, replacing all of the chain rings, half of the original crank is gone. What remains, when combined with a bottom bracket that has a square-tapered axle, is an uncomplicated design that is in some respects more durable and reliable than some other crank designs. But it is still only one of the cranksets that I use. As always, I set bicycles up with other types of cranks when they are requested as custom options, as long as the optional ones are compatible, design-wise, with the type of bicycle in which they will be used. This is especially true among Hybrid Performance bicycles. I'm forever on the lookout for something better, as there just are not a lot of options available currently that I feel comfortable with, design-wise.
FRONT DERAILLEURS- During the past 15 years only three of my touring bikes have been sent out the door without half-step gearing. The half-step system has set the tone for the type of front derailleurs used, and for many years I have used Shimano Ultegra double front derailleurs, which had quite enough lateral travel to be used in a triple half-step system. But, at least as far as I know, there are currently no derailleurs available that are designed for a half-step system without modification, so modification is in order. Shimano 105 and Sora derailleurs can be modified and are still used on RB Touring bikes. For my Performance Hybrid models, I simply follow personal choices depending upon the type of gearing, and the style of crankset, to be used in conjunction with a front derailleur.
REAR DERAILLEURS- For many years the standard rear derailleur on my touring bicycles has been the Shimano Deore XT. During the past year I've had to use the latest version of the Deore XT derailleurs and I'm not a fan, I must admit. Like most bicycle components, I find the newest XT rear derailleurs to be, at least aesthetically and in terms of finish, not easy to appreciate. As with many of the new components that are available, they are just not my style. As I've run out of older models of the XT derailleurs that are 8-speed index- compatible, the current version is the standard until I can find an alternative (which often ends up being older models of the Deore XT I can scare up).
My Hybrid Performance bicycles models are a different matter. I basically use what is requested relative to the type of gearing that is chosen.
CASSETTES- So far, I have had almost complete success in avoiding the use of 9-, 10- and 11-speed cassettes and drive-train components, opting for the more durable 7- and 8-speed chains and 7- and 8-speed systems. My choice of cassettes has often been dictated by what is available that works within a half-step system. If I have needed 12-32 cassettes and they are available from only one manufacturer, that's what I have used. For a long time I used Shimano XTR cassettes until they were no longer available in the cog choices I required. Recently I've been using Sram cassettes, but they are not what I would yet call a standard. As with so many components, options are extremely limited and I simply use what works best for the particular types of bikes that I'm building. As my options change, I modify what I offer.
Hubs and Wheel Design
HUBS- The basic, standard hubs that I have used are Shimano XT, Ultegra and 105 models. However, most of my customers purchasing touring bikes opt for upgrading their wheels with Phil hubs, front and rear, or Phil hubs in the rear and a Schmidt dyno hub up front. This is especially true with regard to my Expedition touring bicycle models in which the stronger, over-sized stainless steel axles of the Phil hubs provide a greater measure of durability on top of their exceptional overall quality. Also, Phil hubs are available in 40- and 48-spoke patterns which is also a oft-chosen option of cyclists touring extensively on dirt. It has been many years since I have built-up a bicycle with Shimano XT hubs. Shimano 105 hubs are a bit different story though as they will be used in each of the Hummingbird XC 700 and Randonneur Lite 700 bicycles that I currently have on order. As high-performance touring bikes, the Hummingbird and Randonneur bikes are generally set up with lighter wheels which require a different type of hub design. The same goes for my Hybrid Performance bicycles as they will be set up with Shimano 105 hubs or will be upgraded to to a hub of a similar design.
WHEELS: SPOKES BY THE NUMBERS- We don't have to go back very far in time to the point in which a vast majority of bicycles that were sold were equipped with wheels that had 36 spokes. It didn't matter whether the cyclist purchasing a bike weighed 120 pounds or 240, they ended up with bicycles equipped with wheels that had the same number of spokes regardless of their weight or the conditions in which the bicycle was used. In essence, bikes with regard to spokes and wheels, were in a one-size-fits-all category. That has changed significantly. These days cyclists may have a much closer custom fit with regard to wheel design as well as numerous options relative to rim types and the number of spokes (in wheels that use traditionally designed spokes) in front and rear wheels. A custom fit may mean adding spokes in expedition-oriented touring wheels or reducing their number significantly if you are a lightweight rider cycling only on paved roads, and will not be carrying gear on your bicycle.
I think that it's a good idea for cyclists to take advantage of the fact that quite a variety of rims and hubs are available to accommodate a wide range of wheel designs. By matching your body weight with the conditions in which you will be riding your bicycle, you'll be able to fine-tune the design of your wheels with respect to the number of spokes in each your front and rear wheels and you also may be able to reduce the weight of rims to develop a high level of efficiency in wheel performance. Obviously, wheels have to be strong enough to provide long-term durability, but at the same time it's pointless to ride on wheels that have overly heavy rims and an excess of spokes. Finding a good balance often requires some experimentation. And, to arrive at a good balance, in terms of me providing appropriate wheels for your bicycle, your input is important. My guess, especially if you are ordering one of my Hybrid Performance bicycles, is that you'll have more experience with lightweight wheels than I do, especially if you are a lightweight rider. Whatever the case may be, I'd suggest that you give some thought to the design of your wheels and to how they may be improved upon in comparison with the wheels that you've used in the past as they will play an important part in the performance of your bicycle.
Custom Lighting Systems of a Wide Range of Designs
As a bicycle tourist I've always equipped my bikes with some type of lighting system using a bottle dynamo. Most commonly I've used a bicycle light as an emergency light source if I've had to extend my riding into the late evening or night in search of a suitable place to camp. Occasionally I've used a light to ride at night or during early morning hours to avoid the heat of the day in hot climates. I haven't had the need to use lights a lot but I do think that they are important and that an emergency light is a good idea for bicycle touring. I've always recommended that cyclists be prepared in some way to ride at night.
Back in the 1990s I started importing Busch and Muller Dymotec S6 bottle dynamos and Lumotec lights as well as Schmidt Son dyno hubs (very, very nicely made hubs), and I've been selling lighting systems ever since. For the ways in which I've used bicycle lights, I prefer bottle dynamos because they only create drag on a wheel when they are being used, and for me that is not very often. Many cyclists love dyno hubs, almost all of which always create a very small amount of wheel drag, on or off, and I've sold more of them than bottle dynamos. In either case, a high-quality bottle dynamo or dyno hub is a very useful component on a touring or commuting bicycle. A lot has changed since I started bringing high-quality lighting systems into the United States. There are more types of systems now available, and the quality of the lights within the systems has improved. I encourage all of my customers that are purchasing touring bikes to consider the use of a lighting system, which are sold as accessories to my bicycles.
I should note that I highly customize lighting systems for my touring and Hybrid Performance Bicycles, mainly in how I mount lights to touring racks and in how I route wires for lights. I've created systems in which I've allowed lights to swivel up and down, and from side to side. I've built systems with dual head lights and have had special stainless parts made to mount bottle generators. I'd suggest that you ask me about the customization of lighting.
Website created by Imagine Web Design. Design of this website ©2013–2026.